S.A.V.E. Launches Program to Preserve History & Help Retiring Small Business Owners
The antique and architectural salvage industry is at a turning point as millions of small business owners retire. Salvage Antiques Vintage Etc. (S.A.V.E.) is stepping up with a new program designed to preserve history while offering a seamless transition for retiring antique store and salvage business owners.
With the “silver tsunami” of baby boomer retirements, an estimated 10 to 11 million small businesses will be up for sale in the coming years. Rather than letting valuable inventory disappear or end up in landfills, S.A.V.E. is actively acquiring antique hardware, architectural salvage, and entire business inventories from retiring owners.
Why This Matters
Preserving Architectural History: S.A.V.E. salvages materials from historic buildings like hotels, schools, and homes.
Supporting Small Business Owners: Retiring antique dealers and salvage businesses can sell their inventory or entire business hassle-free.
Expanding Online Access: With a growing online store, S.A.V.E. makes it easy for customers nationwide to find authentic antique hardware.
A New Era for Antique Hardware & Salvage
S.A.V.E. co-owners are lead the charge, combining business expertise, historic preservation, and years of industry experience. Their mission? To streamline a fragmented industry, offer a sustainable alternative to reproduction hardware, and keep history alive.
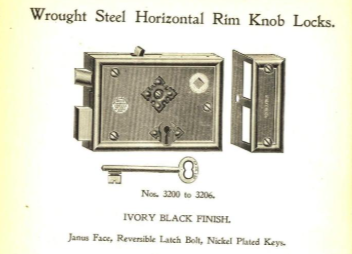
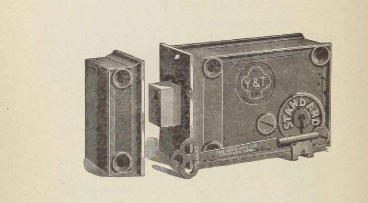
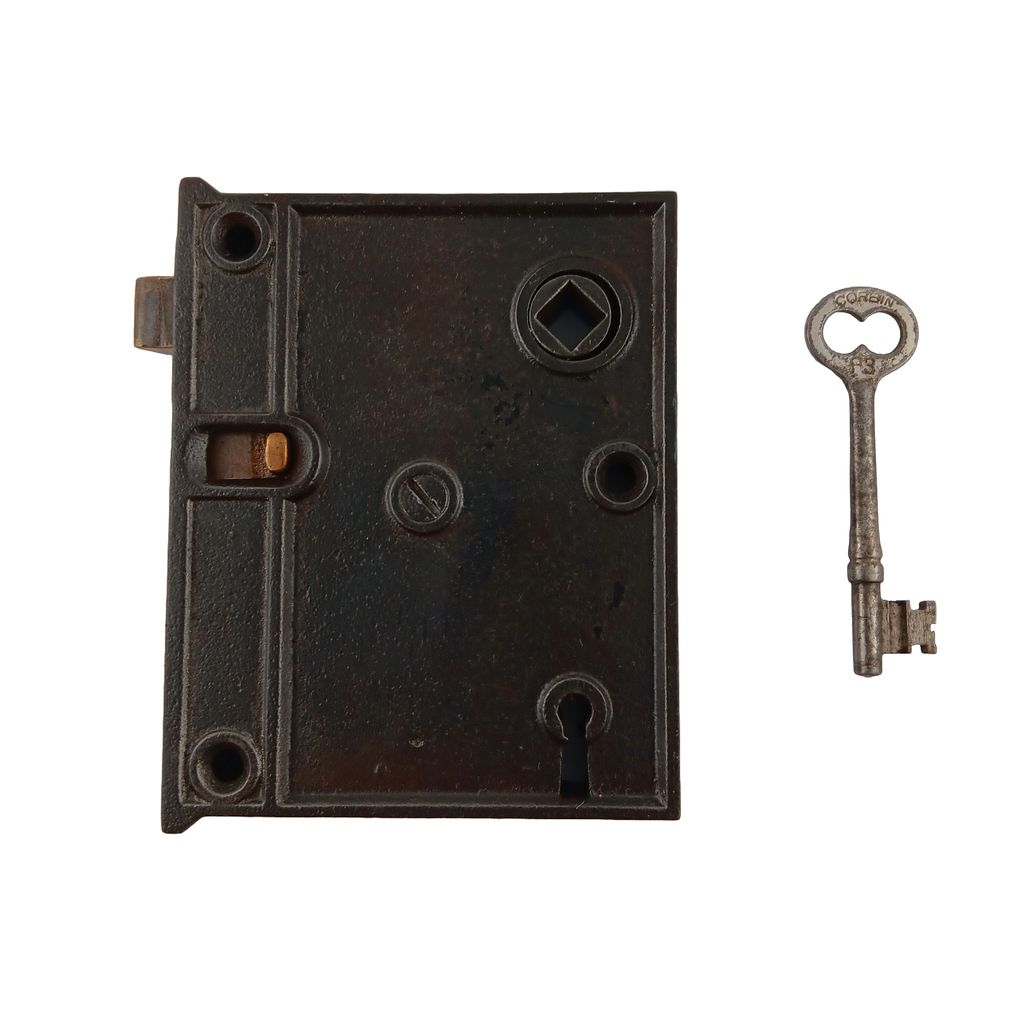
This is an early type of door lock that is mounted to the exterior of the door with usually 3 long screws. Used most commonly between about 1850-1900, these types of door locks were made by most of the major manufacturers. There are two major types:
Horizontal mount and
Vertical/Upright mount
The placement of the doorknob hole (backset) and the keyhole can vary quite a bit on these types of locks, so be sure to measure where your holes are in your door. The good news is that the box covers a large area and the holes needed are very small, so if you need to make minor adjustments it can easily be covered or filled.
These locks were usually used with white, brown, black or swirled (Bennington style) enamel or metal doorknobs. One doorknob would have a flare at the base of the neck. This side goes against the lock. The other doorknob has a regular neck and was used either with a small rosette and keyhole cover or a door plate. Usually the two part rosette and keyhole cover were used with this type of lock because of the variation in doorknob and keyhole placement.
The strike plate for a rim lock is rectangular and mounts to the outside of the door frame with two long screws.
Most of these locks were made as reversable, so you can open up the box and flip the latch part to make it work for either a right swing or a left swing door. The most common setup has a latch for the doorknobs and a deadbolt which is operated with a skeleton key. Many of them also had an additional small latch lock feature where you can lock the latch part from the lock side of the door.
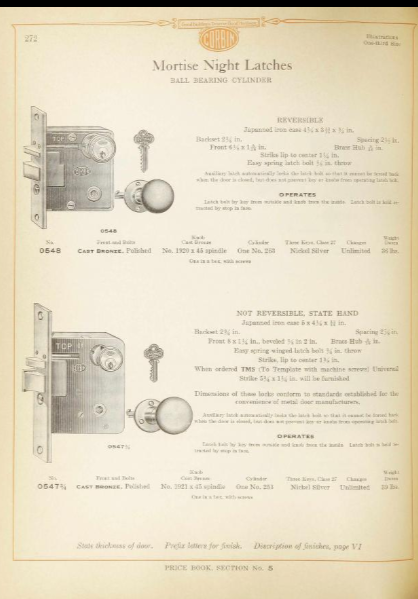
Most night latches are a type of rim lock.
Rim Night Latch
The night latch is an additional security lock usually used on exterior or apartment doors. It was usually mounted above the doorknob. With the most common type, the lock part is mounted to the outside part of the door on the interior. The strike mounts to the outside of the door frame on the interior. These were usually smaller than a traditional rim lock. The interior latch part would have a twisting mechanism or thumbturn which operates the latch. The outside has a simple cylinder lock which takes a modern style key. The cylinder mounts through a small hole in the door and attaches into the back of the night latch.
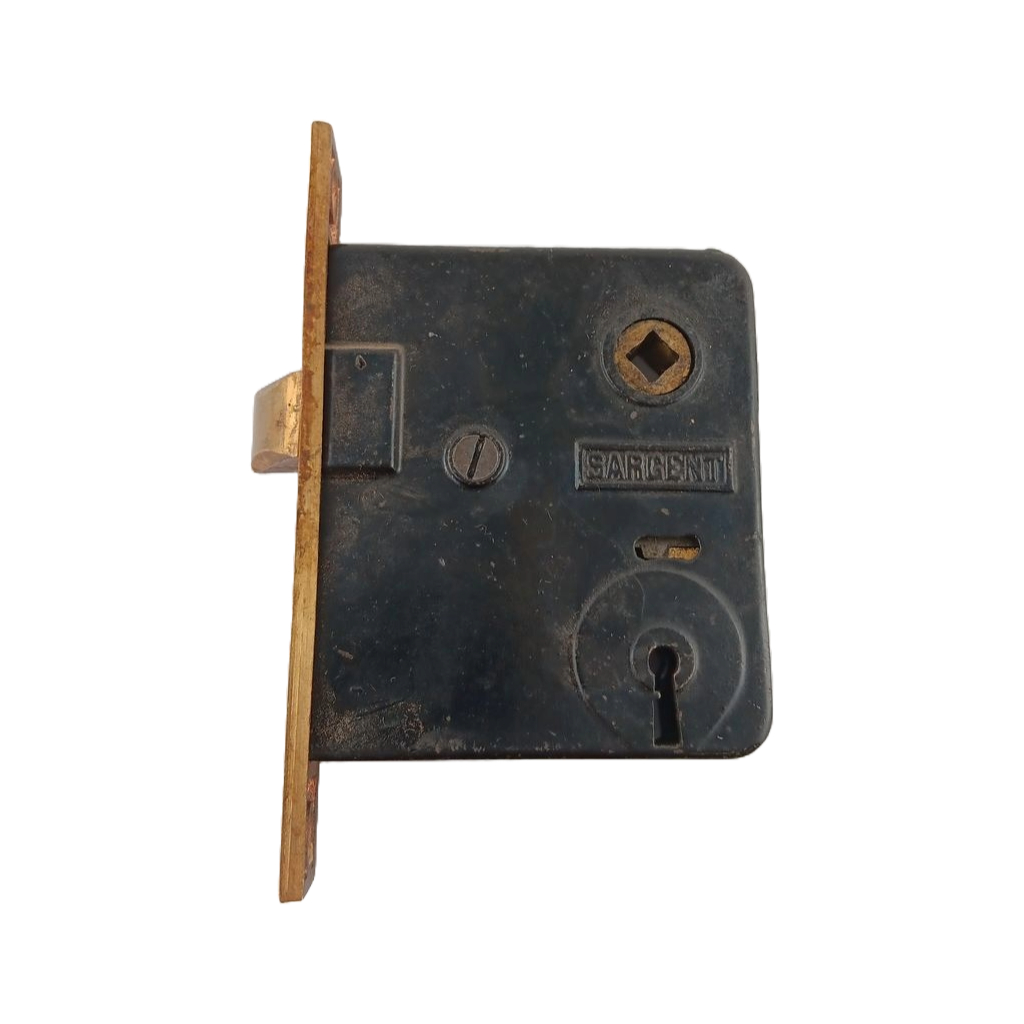
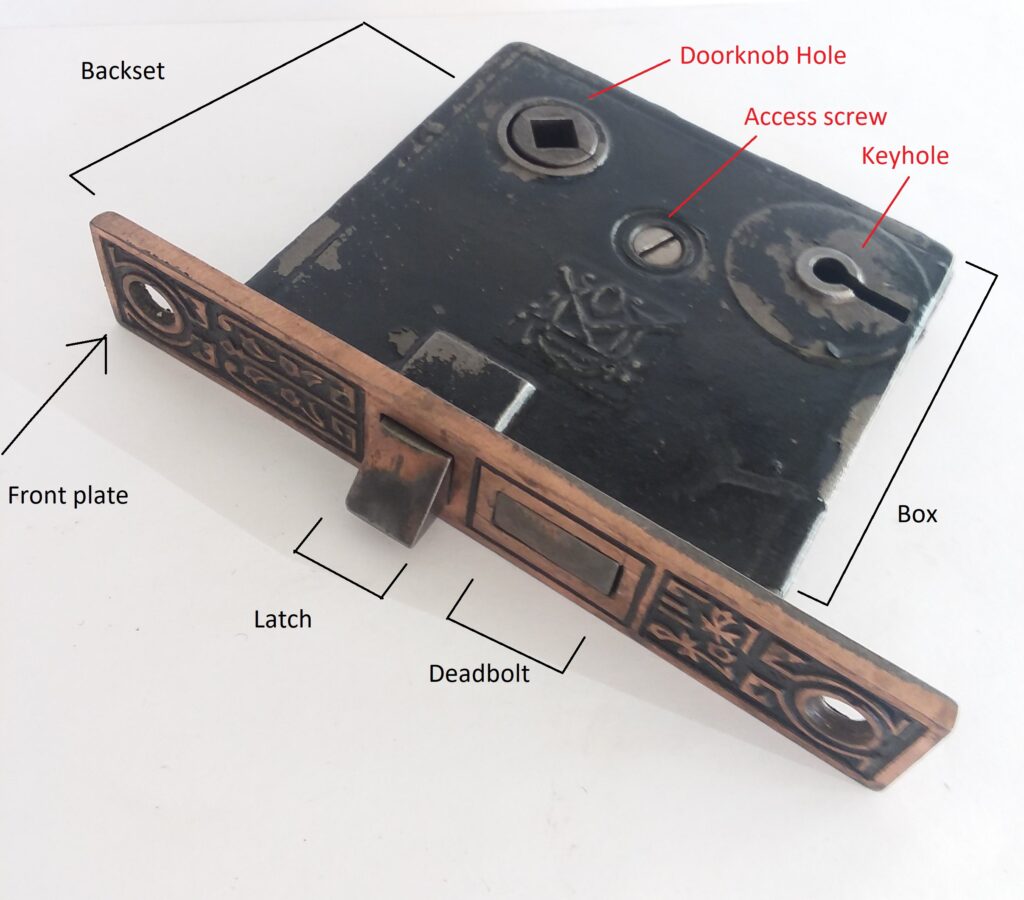
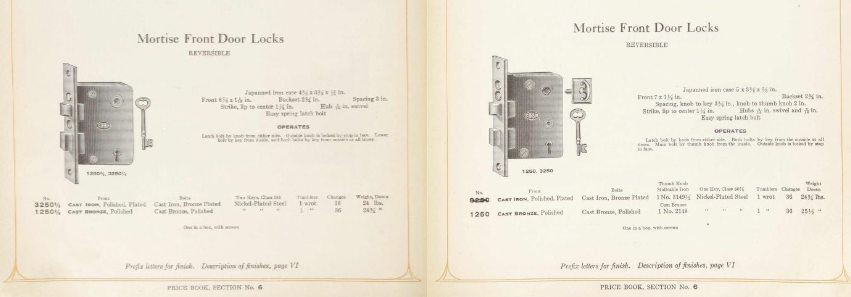
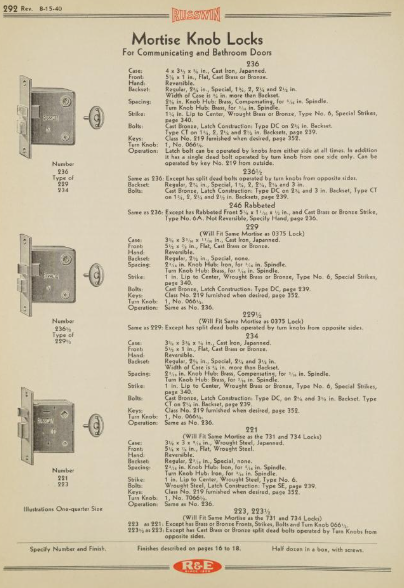
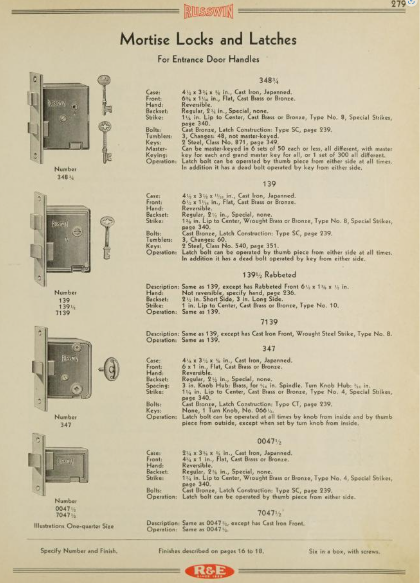
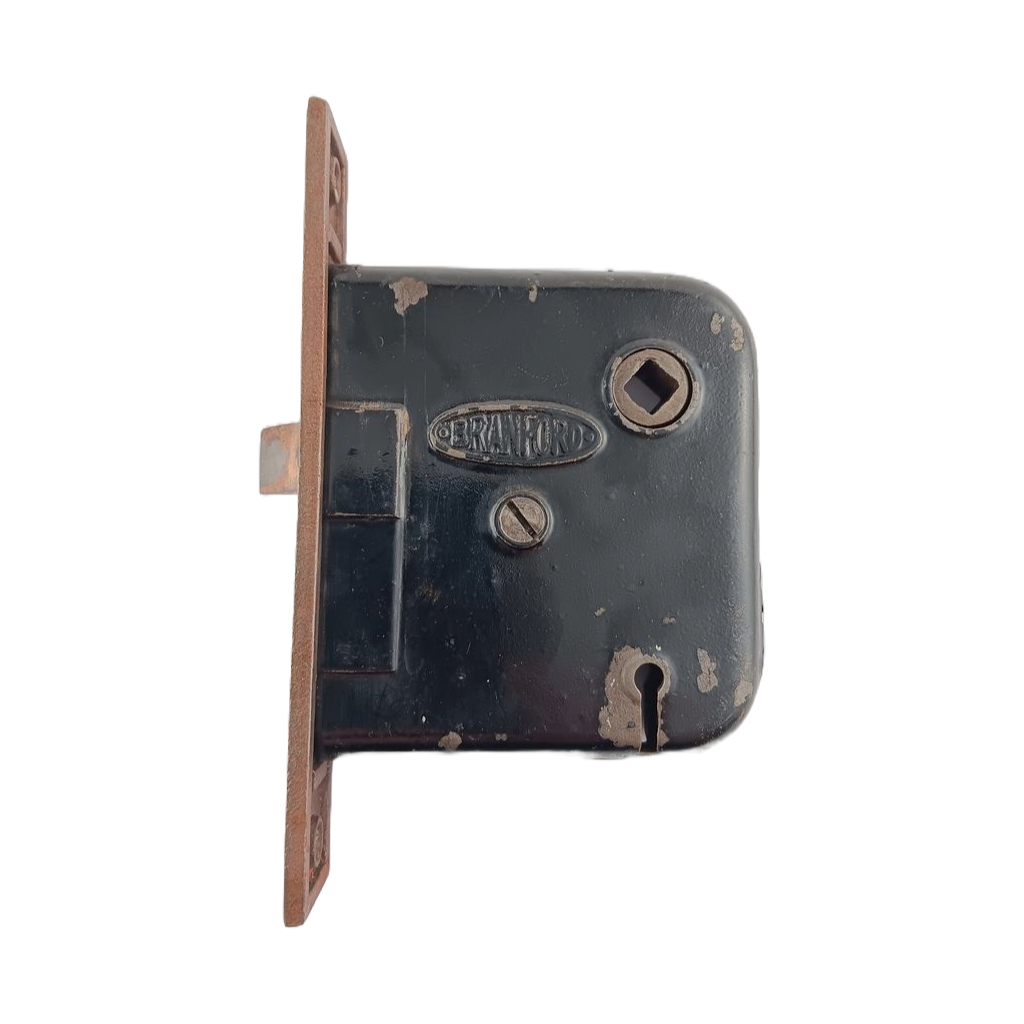
Mortise Lock
Mortise locks are named such because they fit into a large cutout (mortise) in the door. These were commonly used from about 1890- the 1940’s. The size of both the box part and the front face can vary quite a bit depending on what type of door they were made for, so it is important to measure both the cutout in the door and the cutout on the edge.
Most of these locks were made as reversable, so you can open up the box and flip the latch part to make it work for either a right swing or a left swing door. The most common setup has a latch for the doorknobs and a deadbolt which is operated with a skeleton key.
Mortise lock boxes made for interior doors are fairly standard and have minor variations- usually within about 1/2”. The distance between the doorknob hole and the keyhole is usually the same for interior mortise locks.
Mortise locks for exterior or commercial doors can vary quite a bit and the distances between the doorknob hole and keyhole also vary. There are also special mortise lock boxes that were made for screen doors or doors with large areas of glass where the wood frame is smaller. These can vary quite a bit in size, backset and doorknob hole-keyhole distance.
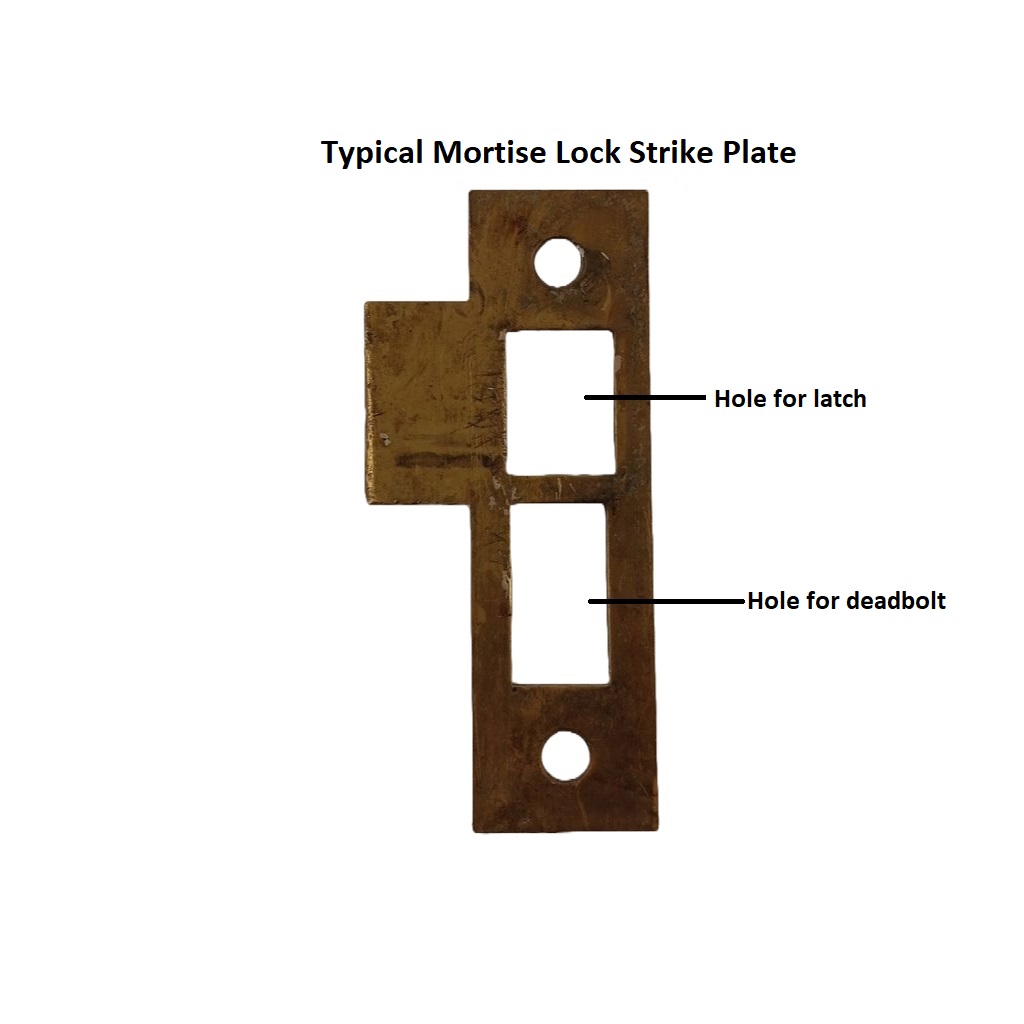
The most standard setup is one with a latch operated by the doorknobs and a deadbolt operated with a skeleton key. This takes a two hole strike plate that is attached to the door frame.
Other fairly common types of mortise locks are:
Exterior door lock boxes which are usually larger and often have a 2 push button function to lock the latch from one side.
Pocket door lock boxes with a push button and/or skeleton key latch function
Thumbturn locks with a thumb latch activating the deadbolt instead of a keyhole. Often the latch would be only used on one side. An example would be a bathroom door which can be locked from the inside, but not the outside. The distance between the doorknob hole and the latch hole was not always standard.
Small latch locks that do not have a deadbolt. These are similar to modern interior door latches, but are a bit larger.
French/glass/screen door locks. These were about half the depth of a standard lock box and were made to fit into smaller frames. They usually still have both the latch and deadbolt functionality.
Hotel/apartment locks. These are larger exterior boxes used for hotels or apartments. They have a two different keyholes which both work on the deadbolt. One would be for a universal landlord key and the other would be for the tenant key.
Thumb latch handle lock boxes have a bar at the bottom which is pushed up by the handle’s thumb latch
Mortise lock with cylinder- these have a large hole usually at the top for the addition of a cylinder lock which takes a flat type key instead of a skeleton key.
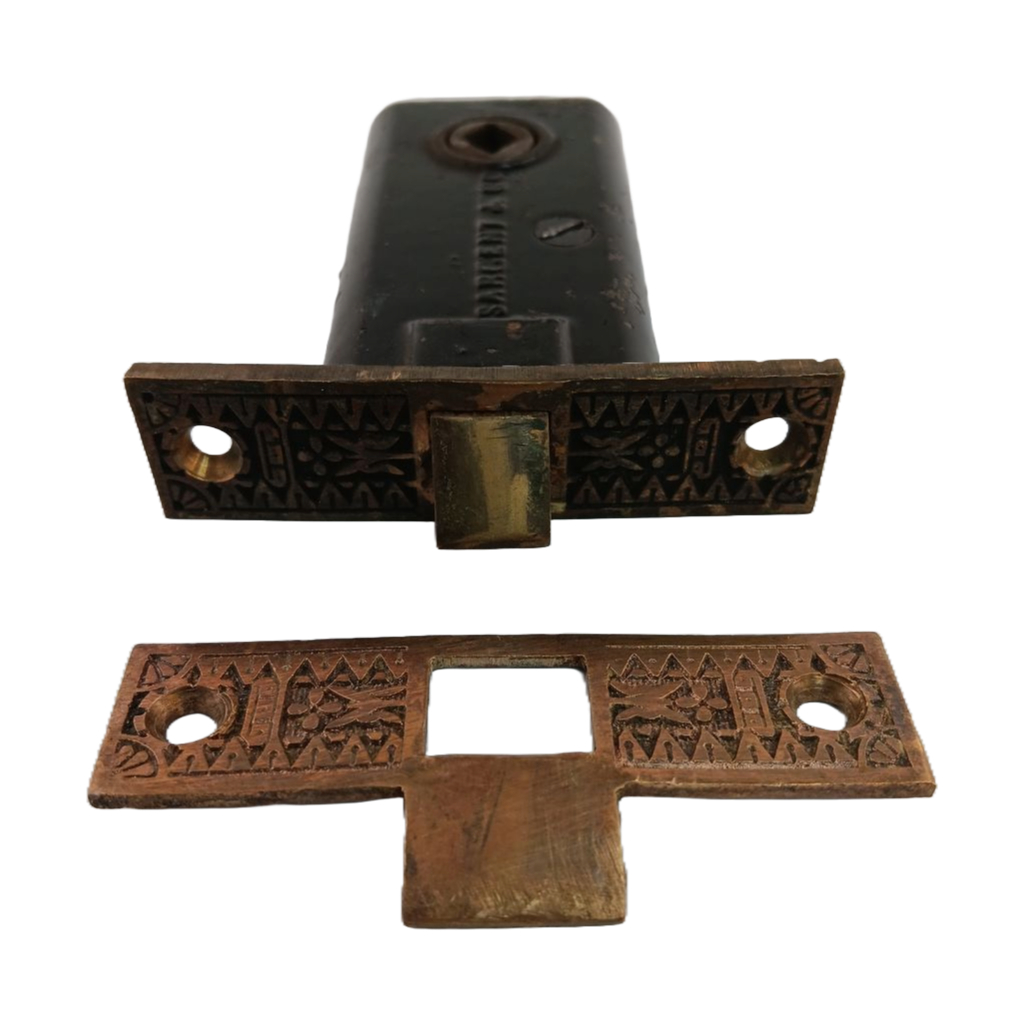
Strike Plate
A strike plate can refer to any metal piece that is used to protect a cutout in wood where a latch of some type fits in.
On doors, the strike plate is used with a lock of some type and is mounted to the frame of the door to protect the wood from being damaged and hold the latch/deadbolt of the lock securely in place. Strike plates for rim locks and latches mount to the exterior of the door frame. Strike plates for mortise locks mount inside the door frame and are inset into the frame. Modern strike plates are often just a single hole. Most antique strike plates for mortise locks have 2 holes.
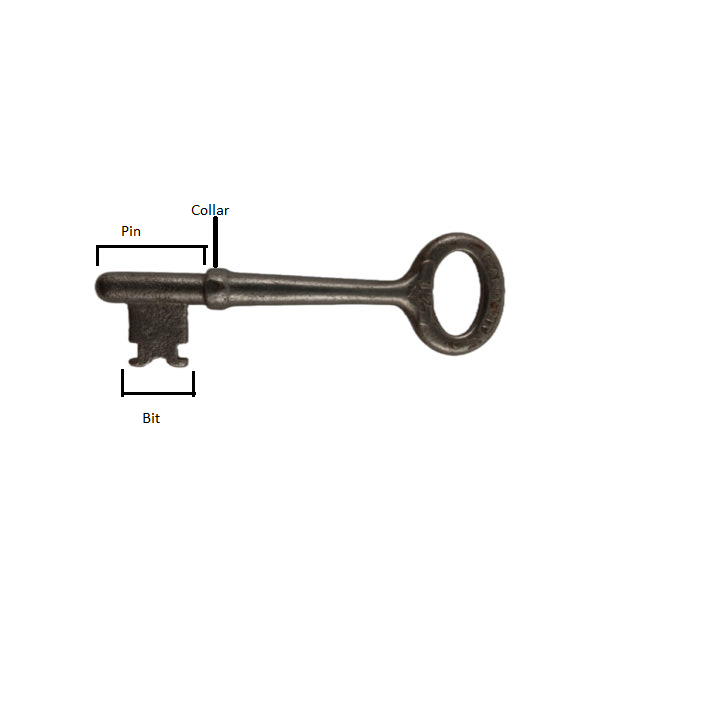
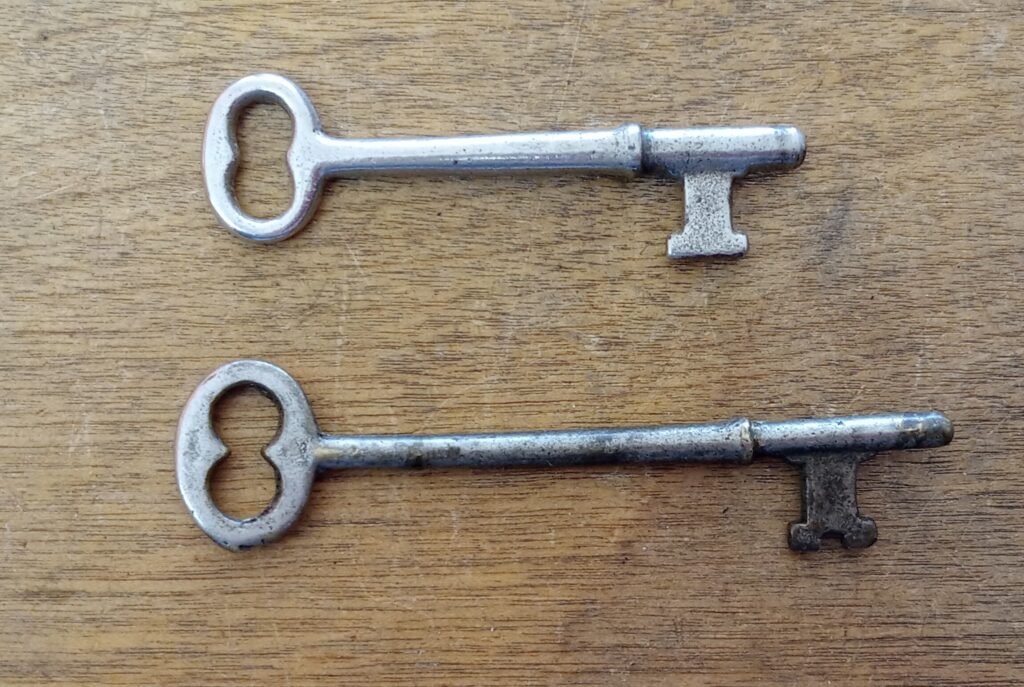
Skeleton Key
Skeleton keys are used for antique door, furniture or gate locks and differ from a modern style key in that the barrel is full round as opposed to flat. Door keys usually have a solid barrel while furniture and gate keys sometimes have a hollow barrel for a pin that extends from the lock.
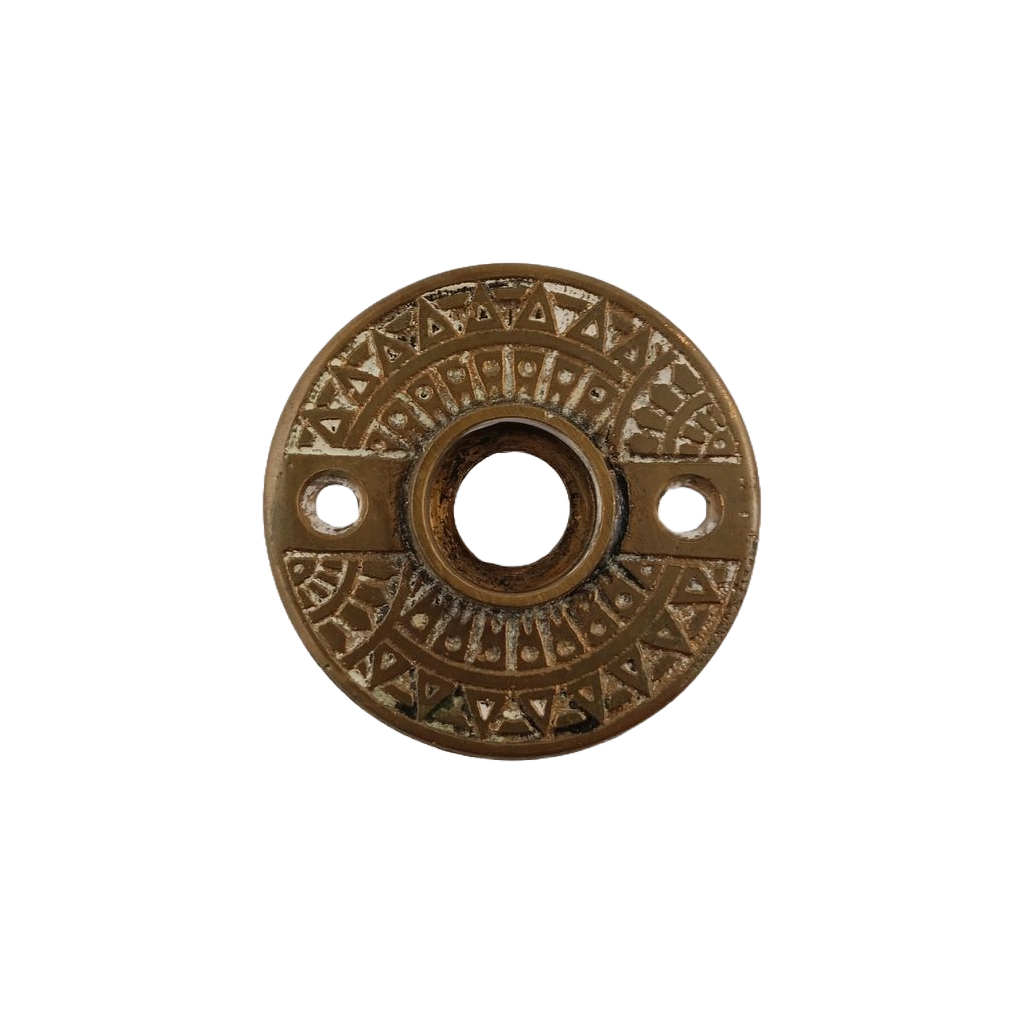
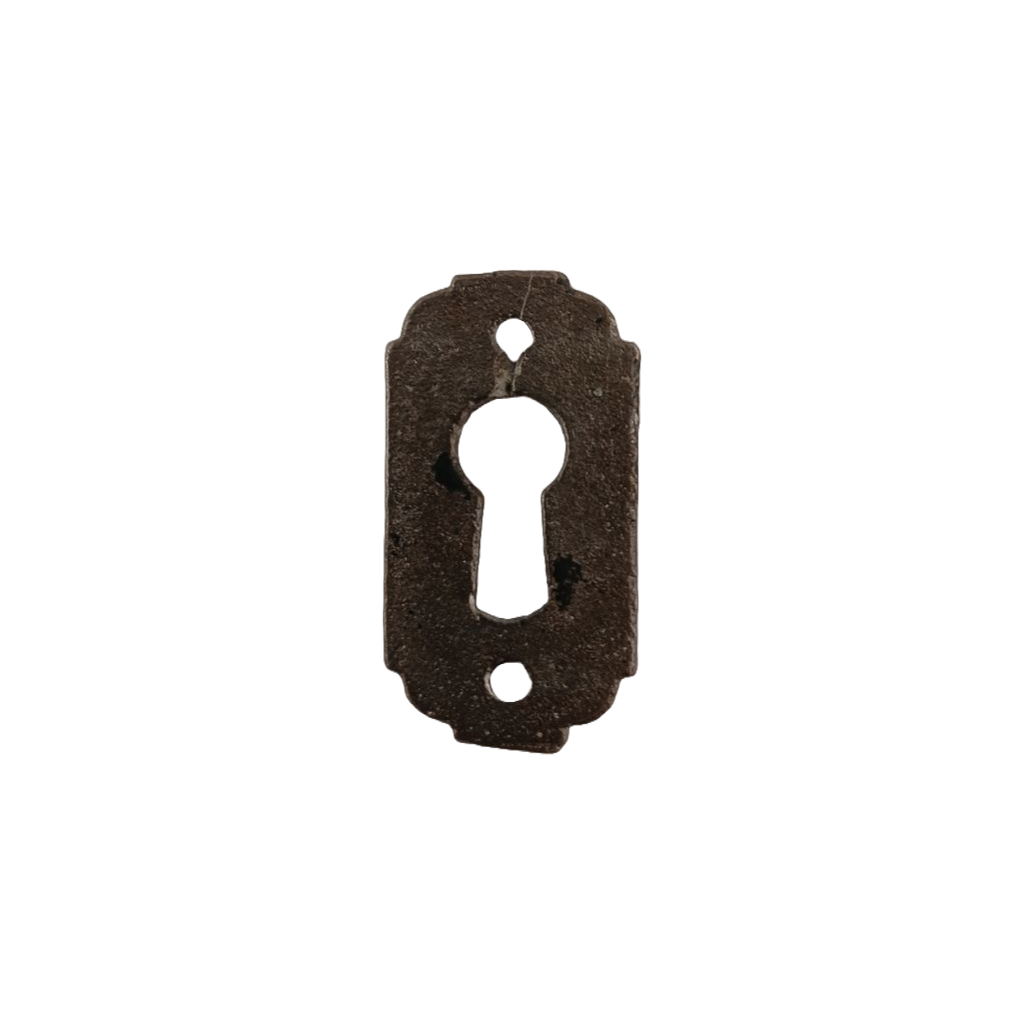
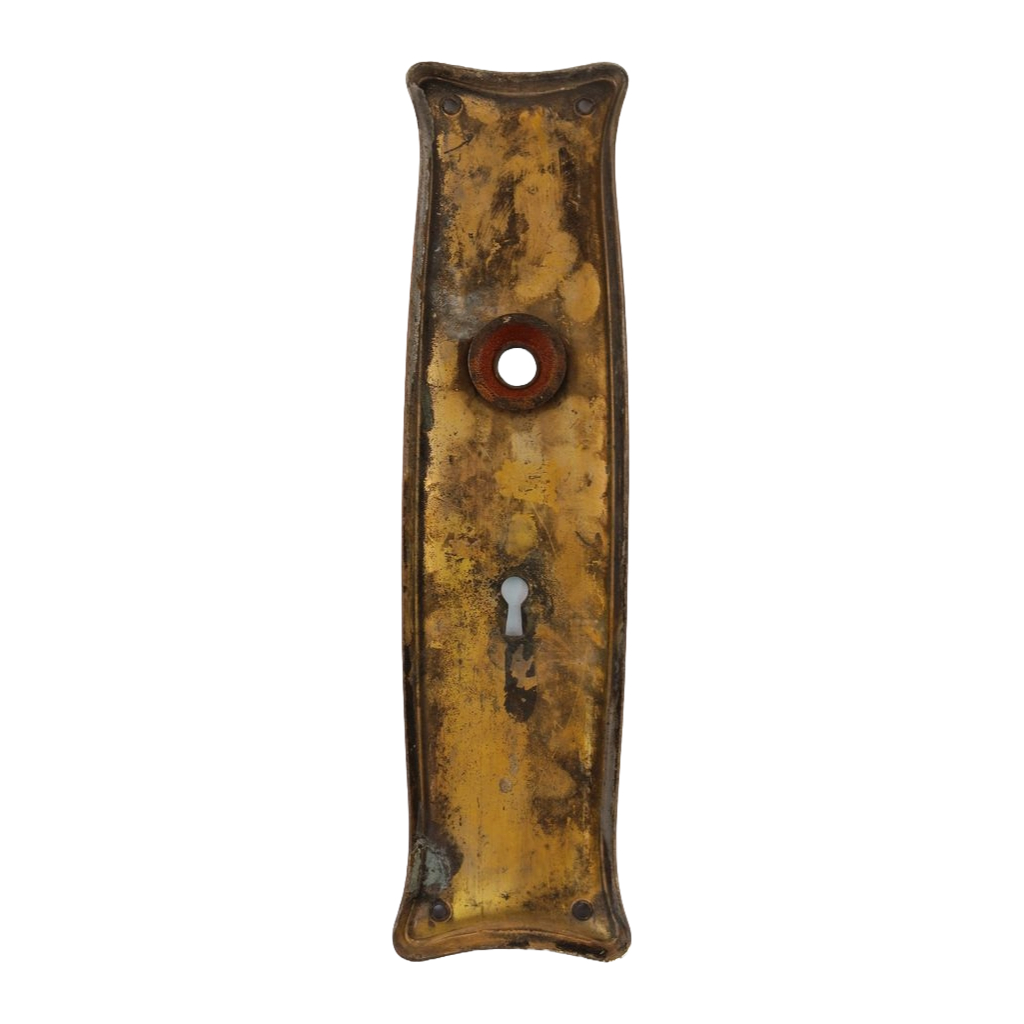
Escutcheons
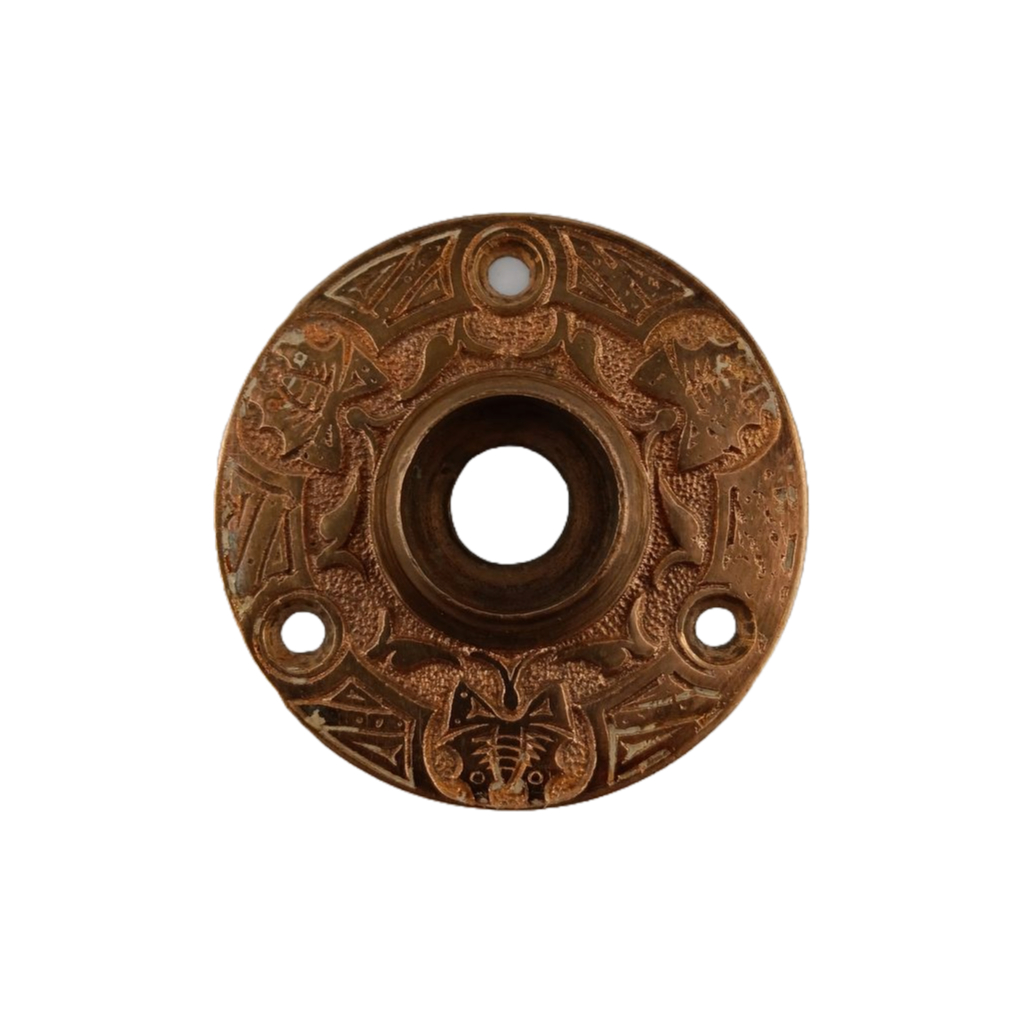
Escutcheons are any type of cover that goes on the outside of the door to protect the doorknob hole and keyhole. In the case of an externally mounting lock box, and escutchoen would be placed on the oposite side of the door to the lock box. In the case of mortise locks, an escutcheon would be places on each side of the door. There are three major types of escutcheons:
Rosette- a basic round cover that only covers the doorknob hole.
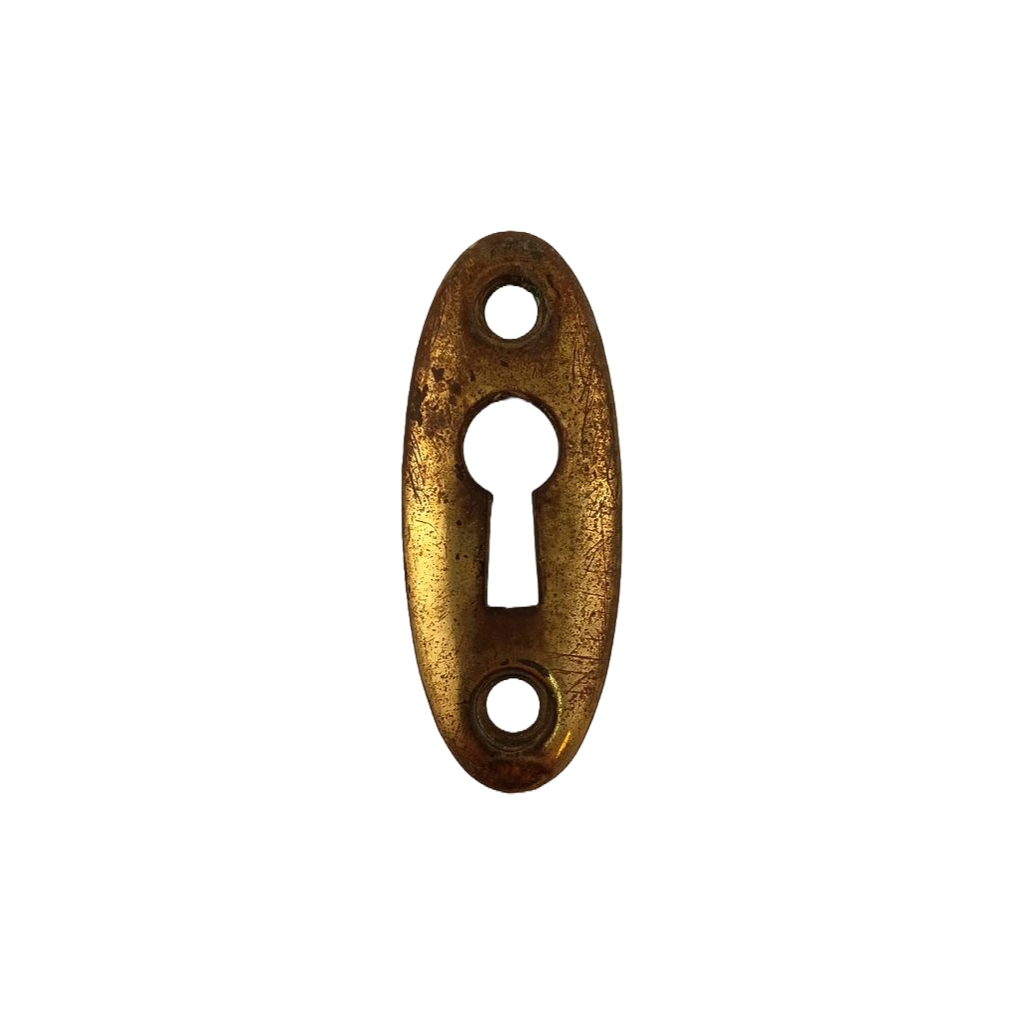
Keyhole cover or thumbturn latch- this would be used in conjunction with a rosette to protect the keyhole or latch hole. Smaller keyhole covers were also used on furniture pieces to protect the wood around the keyhole.
Door plate– this is a combined rosette and keyhole cover into one piece. Although the distance between the doorknob hole and keyhole tended to be fairly standard for interior doors, it can vary quite a bit for exterior doors or doors with latches instead of keyholes.
Pocket door plates are a bit different from standard door plates because they have to mount flush. They were made both with and without keyholes. A pocket door plate required cutting a bit more out of the door to fit the inset handhold. Some flush mount window sash lifts were used both for windows and pocket doors. A pocket door plate is great for the back of a barn door.
Door Hinges
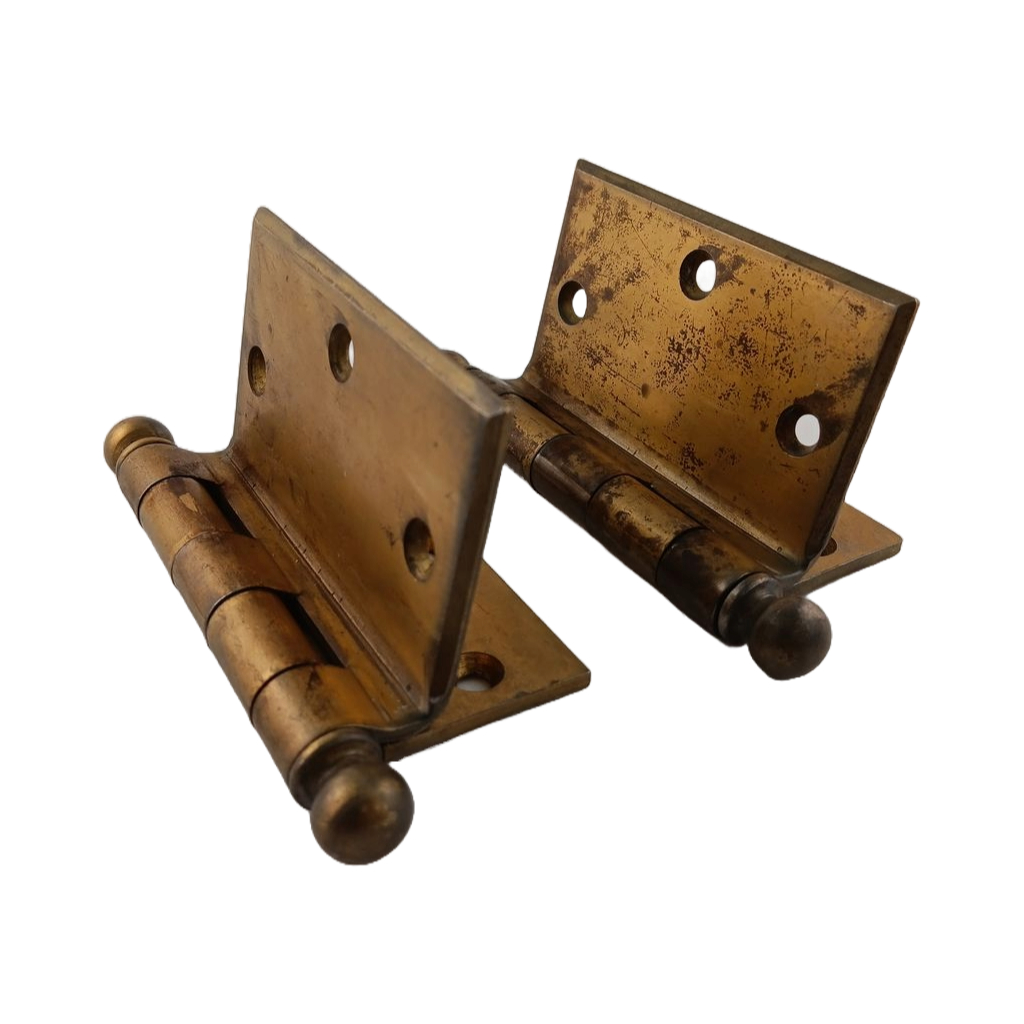
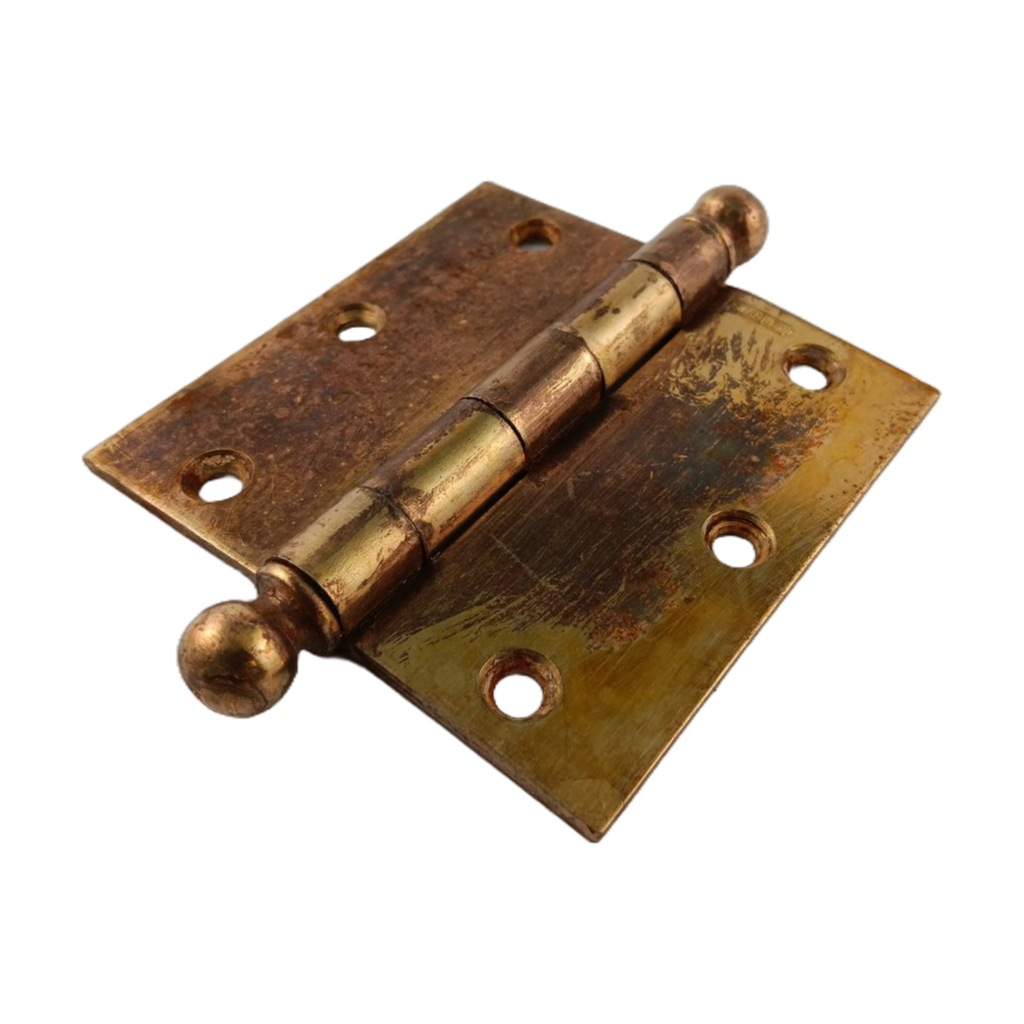
Most older door hinges had either a ball finial or a more decorative finial end. More modern hinges tend to have a rounded cap and rounded corners. The two major types of door hinged are:
Surface mount- these are offset hinged where one end mounts to the front of the door and can be seen and the other end mounts into the door frame. The side that mounts to the outside of the door usually has a beveled or slightly decorative edge. The most typical size for interior doors is 3 1/2” with 3 holes. Larger doors or exterior doors may have had larger hinges with more holes. Very early doors (1800’s to very ealy 1900’s) sometimes had smaller hinges.
Mortise hinge- This is the most typical type of hinge that mounts into a small cutout on the side of the door and the other side mounts into a small cutout in the door frame. The most typical size for interior doors is 3 1/2” with 3 holes. Larger doors or exterior doors may have had larger hinges with more holes. Very early doors (1800’s to very ealy 1900’s) sometimes had smaller hinges.
Latch converter
This is a modern piece of hardware that fits into most standard modern door cutouts and allows an old square shaft doorknob to be used. Some are adjustable for different backsets and there are shorter ones out there for french doors and screen doors. This will allow you to use old hardware on a modern door without having to modify the door. Note that the modern hole through the door is 2 1/4”diam. Almost all antique rosettes and some of the older door plates are too small to cover this hole. You will need full sized door plates (2 1/4”w or more) on each side of the door in order for everything to function properly.
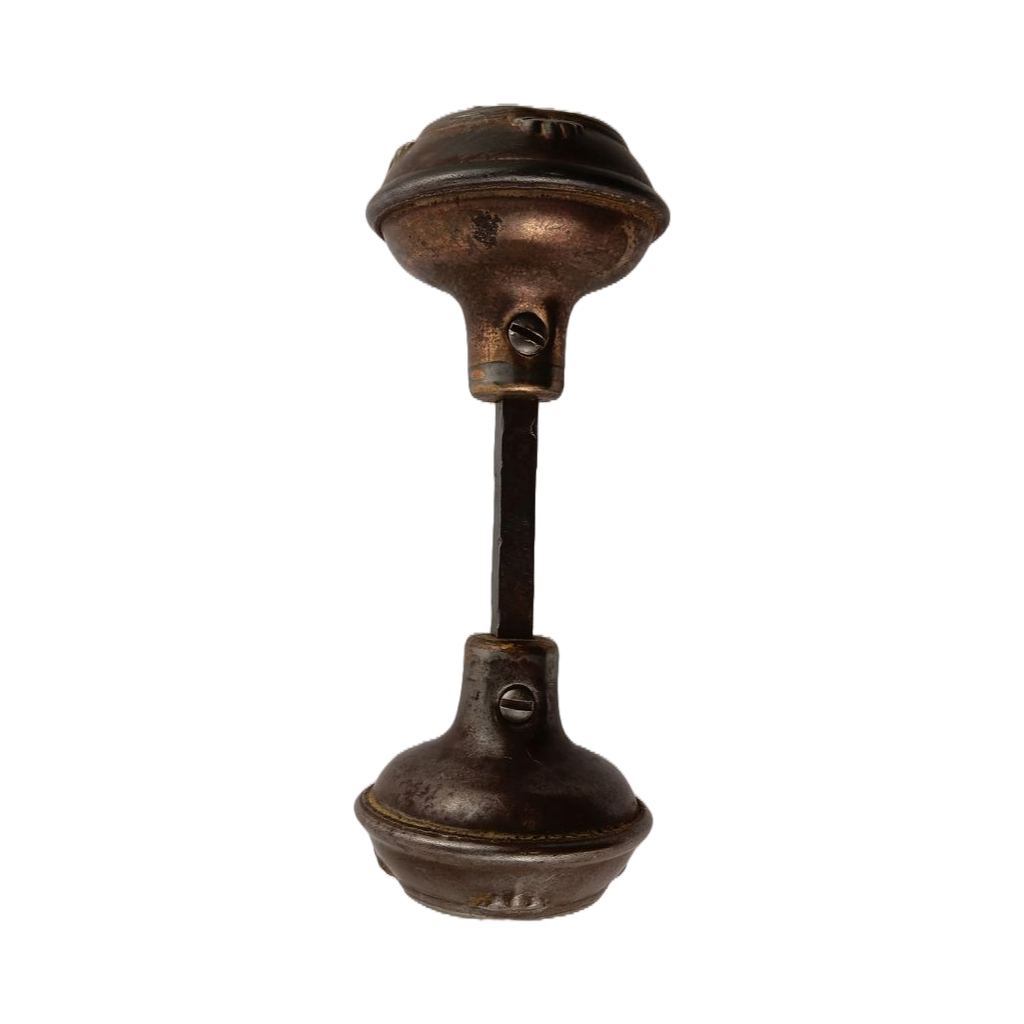
Doorknob Shaft/Spindle
This is the piece that connects the two doorknobs and goes through the square hole in the lock box. Most were adjustable in some way to accommodate different thicknesses of doors. Minor adjustments can be made by adding small washers in between the door plate and the base of the doorknob.
The typical size for a doorknob shaft/spindle is 5/16”. Some exterior and commercial shafts were larger. Some screen door types were smaller. There are a few unique shafts out there that were introduced as innovations and used for only a few years. These include a variety of screwless shafts, shafts where a screw in the center of the doorknob would screw into the end and 3 part shafts held on one side by a pin. There were also a few companies that had their own ways of connecting things and whose hardware only works with their unique pieces. Two of those companies were Gilbert and Chicago Hardware.
The two main types of doorknob shaft spindles are threaded and non threaded. There were also combination shafts with ine threaded side and one non threaded side.
Threaded shafts can be squared or rounded and require the neck of the doornob to be threaded on the inside. They are held in place by a flat set screw that is threaded into a small hole on the side of the neck of the doorknob. That screw is tightened down to the flat part of the shaft. Threaded shafts allow a bit more adjustability than non threaded shafts.
Non threaded shaft/spindles are square with multiple holes on each end for adjustability. A small screw is threaded into the shaft through a small hole in the neck of the doorknob. Nonthreaded shafts are somewhat limited due to the number and spacing of the holes which varies. For oval doorknobs, sometimes the holes in the shaft had to be offset so that the oval would stand upright on each side.
There are longer and shorter versions of each type of shaft for different types of doors. There were also security options for exterior doors which used a pin through the shaf instead of a screw on the outside knob. Further security could be added by adding a swivel that works with single sided locking lock boxes.
The following images show the options from just one catalogue:
When looking to match a skeleton key to one of your antique or vintage locks, the first thing to consider is what type of skeleton key you need. There are two major types of skeleton keys:
Hollow barrel -which allows a pin inside the lock to be inserted into the end of the key. These types of keys are often a bit smaller and are typically used on trunks or furniture pieces. You should be able to see if there is a pin sticking out of the center of the lock hole.
Solid barrel– these could be used on either furniture or door locks. There is no pin in the lock, just an open hole. The barrel of the key will be solid.
Next, if you can find a maker or brand on your lock that is great! It may help you find a key if the key is also branded. Don’t get hung up on this though. It is wonderful to have a matching branded key, but the most important thing about the key is the shape- not the brand. Historically just like today you had key companies and generic keys that were made for various locks. Also, a majority of keys (not to mention the hardware they went with) were not marked, so focusing more on the shape will give you far more options.
Furniture/Trunk Keys
For furniture keys there are a few things to consider once you figure out if you need a hollow barrel or not. First, the general size and shape of the key. Measure your keyhole. The size of these keys can vary quite a bit and if you know what will fit into your keyhole you can narrow down your options significantly. Some keys have bits (the extensions off the end) on both sides, most just on one. How long can the bit be? Also consider how long the key needs to be. Next, if you do need a hollow barrel, how large is the pin extending out of the lock? The barrel needs to be large enough to fit comfortably over the pin, but not too large that it does not fit into the keyhole. It also needs to be a long enough opening to fit fully over the pin to be able to reach the tumblers.
From here, unfortunately it is usually a matter of testing to find out what shape works. Before you begin testing, I recommend squirting a bit of WD40 or lock lubricant into your lock. You would be amazed at the difference this will make. If you find a key that moves the bolt a little, but doesn’t fully work, you are on the right track. Concentrate on keys with a similar shape to that with slight variants to find one that fully connects with the mechanism.
The most commonly used shapes I have found for furniture locks are the single edge notch and double edge notch as seen in this catalogue:
These two shapes are a good place to start. One of the two has a good chance of working. If these don’t work, you may need to move onto more complicated shapes.
Door Locks
Skeleton keys for door locks are a bit easier than furniture locks, as they will all have a solid barrel. However, minor size and shape variations can make a difference. First of all, make sure you are needing a skeleton key, not a flat key for your door lock. Skeleton keys need a large, open hole. You should be able to see through it. If possible, remove your lock from the door and inspect it. It is best to test unknown keys with the lock removed anyway in case they get stuck.
Check the outside of your lock box for any markings. These could be on the box, deadbolt, front plate, or inside the box itself. This may help you identify a maker. Sometimes, particularly if the marking is next to the keyhole, it may identify what key number you need. This only applies, however, if you can find a branded key matching your lock brand.
When you have the lock off the door, you might as well do some maintenance to make sure everything inside is good to go and functional. Check for any paint on the face where the latches are. If there is paint. at the very least take a razor blade and run it around the edges of the deadbolt, removing as much buildup from around the deadbolt as possible so that it can move freely. If you are brave enough to open the lock box up, use the screw or screws on the box part to remove the top of the box. Be very careful and move slowly, as sometimes things are under tension and you don’t want any parts to go flying. Before touching anything take a picture of the inside- this is important- you will never figure out where those pieces go if they get moved. There are thousands of variations of lock boxes and very little documentation on them, so be smart!
Once the lock is opened, manually try to manipulate the deadbolt. Does it move freely? If there is paint buildup, carefully remove the deadbolt part and clean all around the bolt and the edges of the hole until it can smoothly slide in and out. Now is a good time to clean up a little in there and add a little lubrication. Look for any markings inside to identify the lock and inspect the tumbler parts to see if you can gauge what shape key it might need. This is tricky, but you may be able to tell if it needs a notch or multiple notches. The more complicated the tumblers, the more complicated shape the key will be. Also see if there are any projections on the top or bottom of the box itself that may limit the movement of the key.
Carefully close up your lock and inspect the keyhole. Are there any small projections on the keyhole and how large is it? Projections will require either a groove along the key in that location or a very narrow key to fit between the projection. If the keyhole is larger, you will more likely need a beefier key with a larger bit. Keep the lock off the door while testing. If a key happens to get stuck, just loosen up the box cover and you can easily remove the key. Not so much if it is back on or in the door.
Just like furniture keys, there are two “generic” shapes of keys that have a good chance of working and are a good starting point. These tend to be the smallest in size and the most basic shapes. One of these two will have a good chance of working, or they can usually at least give you a good idea of whether you need a notch at the base of the bit or not.
The good news is that if you have all original locks, the key tended to be the same throughout most of the house. So once you find a key that works well- be sure to test on both sides- it should work on multiple locks.
Door Knobs for Old Doors: A Guide to Styles, Manufacturers, and Materials
When restoring an old door, choosing the right door knobs can make a world of difference. Not only do they enhance the character of your door, but they also provide functionality and authenticity to match the period of your home. Whether you’re restoring a Victorian masterpiece, a farmhouse, or a mid-century classic, there are countless styles, materials, and finishes to explore. Here’s a comprehensive guide to selecting door knobs for old doors.
Understanding Door Knob Styles for Old Doors
Before you start shopping, it’s important to understand the mechanics and compatibility of your old door. The following factors will dictate the type of door knob you can use:
1. Lock Type
Mortise Locks: Common in pre-20th-century doors, mortise locks require door knobs with a spindle that connects through the door. These are usually paired with ornate backplates or rosettes.
Rim Locks: Often found on earlier, thinner doors, rim locks are mounted on the surface of the door. They typically work with smaller, simpler knobs, often made of ceramic, wood, or cast iron.
Mortise Lock
Rim Lock
2. Door Thickness
Measure the thickness of your door to ensure the spindle of the knob set is long enough to reach through. Older doors often vary in thickness, especially if they’ve been repaired or modified over time.
3. Distance Between Spindle and Keyhole on Older Doors
The space between the spindle hole (for the doorknob shaft) and the keyhole is an essential measurement when selecting hardware for old doors. If you plan to use a keyhole cover and rosette, the distance between these two features may be flexible. However, if you’re using a full door face plate, the distance between the spindle and keyhole must precisely match the plate design.
Always measure this distance carefully, as older doors often have unique configurations that differ from modern hardware standards. Choosing a mismatched face plate may result in an awkward fit or require significant modifications to your door.
Overview: Commonly used in the early 20th century, pressed steel knobs are lightweight and durable. They were often paired with plain steel or painted backplates.
Best For: Early Craftsman, Bungalow, or simple farmhouse doors.
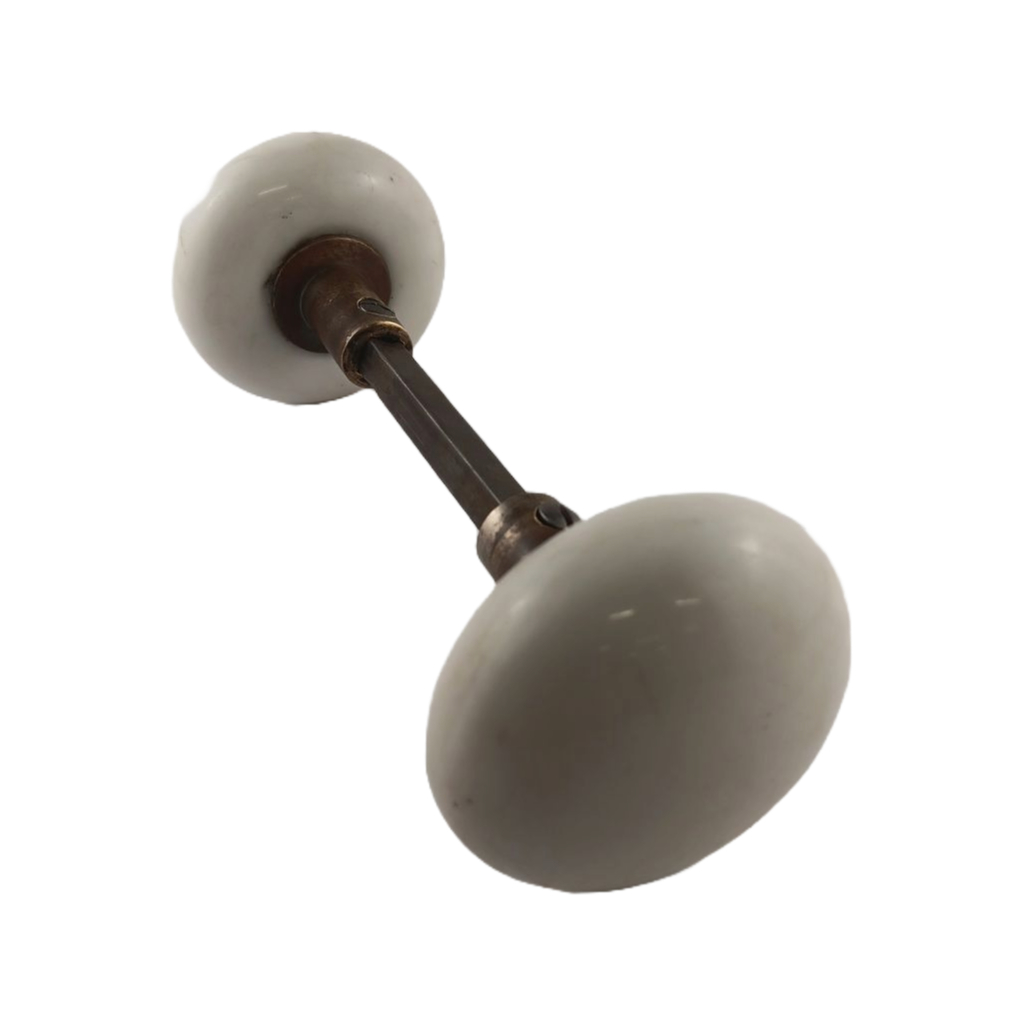
Ceramic Knobs
Overview: Ceramic knobs gained popularity in the mid-19th century and remained a staple for decades. They come in several colors and patterns.
Styles:
White or Black Ceramic: Classic and timeless, often used in Victorian homes.
Brown or Swirl (Bennington): A marbled ceramic finish that adds warmth and uniqueness.
Best For: Victorian and early Colonial Revival styles.
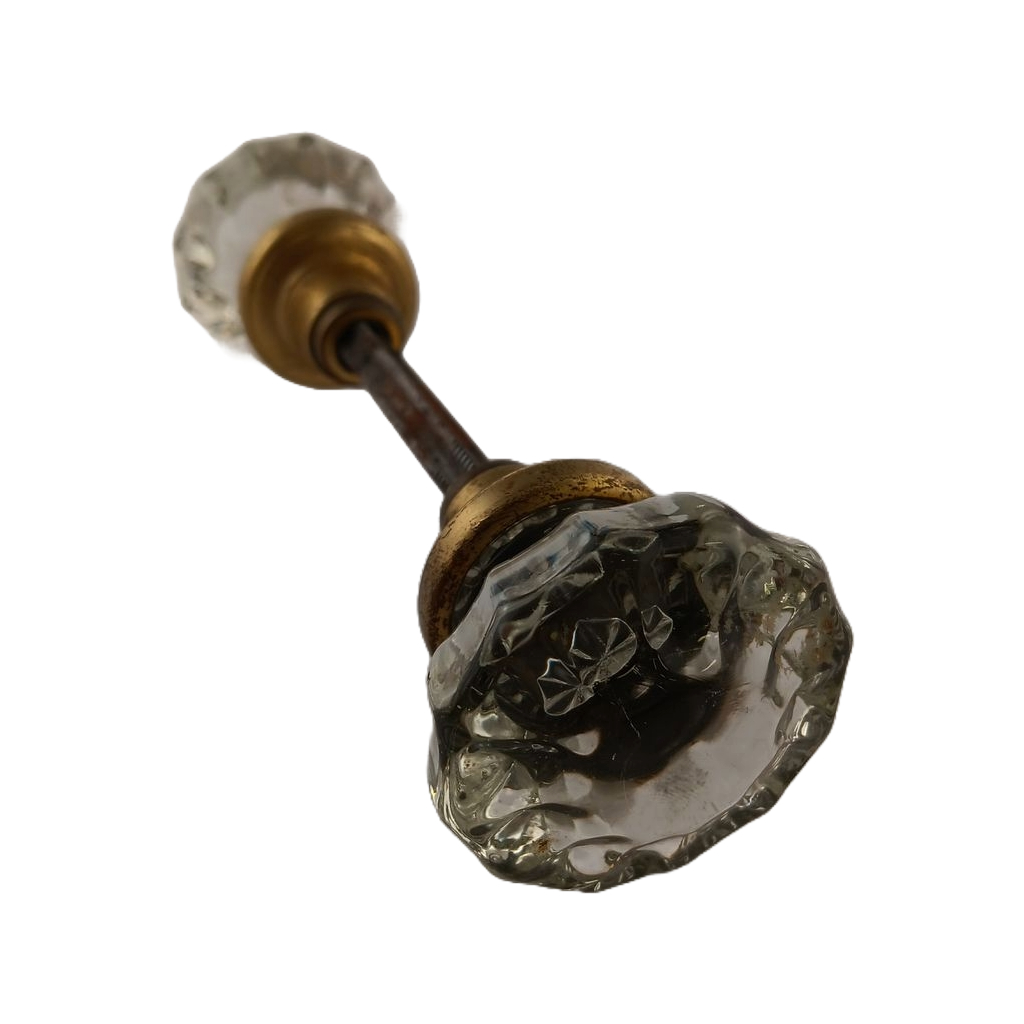
Glass Knobs
Overview: Faceted glass knobs became popular in the 1920s and 1930s, often paired with brass or nickel rosettes.
Best For: Art Deco and mid-century homes.
Cast Iron and Wrought Iron Knobs
Overview: These knobs are sturdy and simple, reflecting the practicality of rural homes and cottages.
Best For: Rustic, farmhouse, or early American styles.
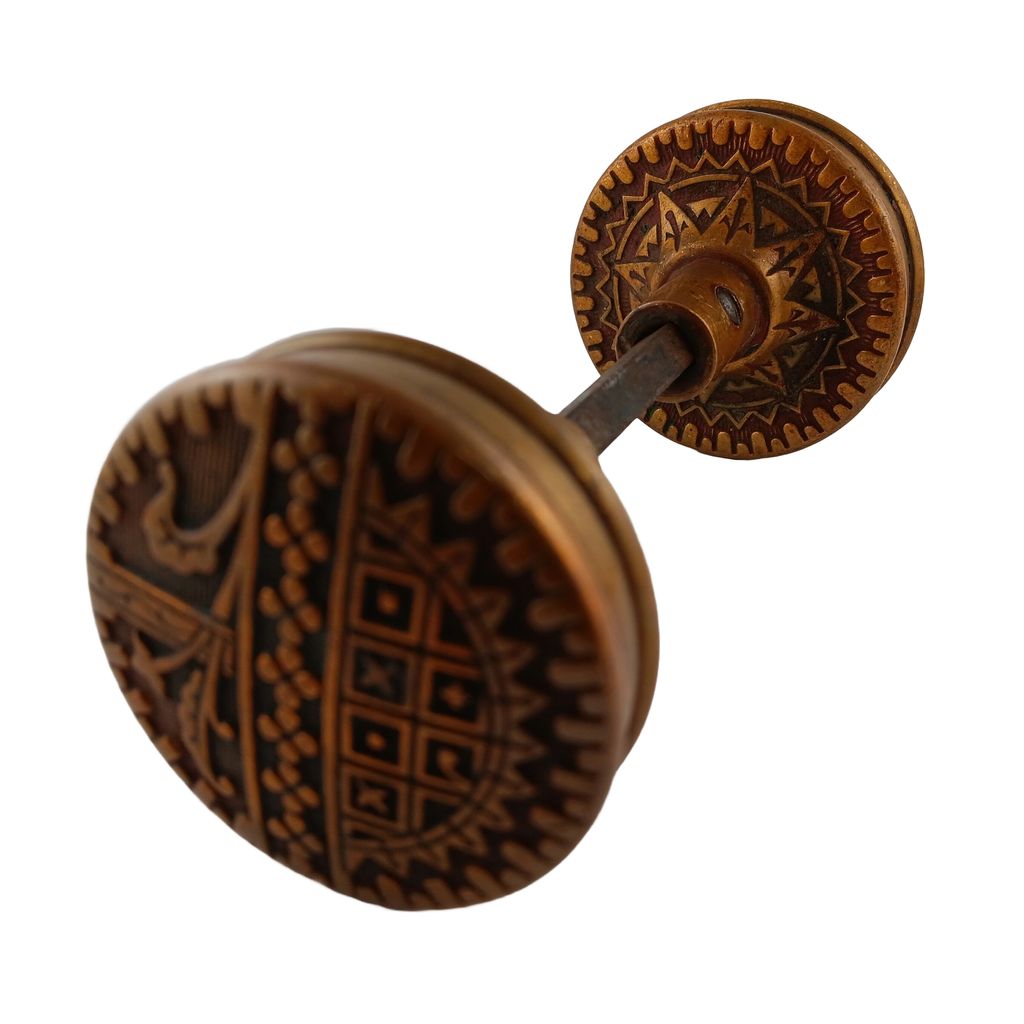
Brass and Bronze Knobs
Overview: Often highly detailed and ornate, brass and bronze knobs are a hallmark of Victorian homes and can be polished or left with their natural patina.
Best For: Victorian, Edwardian, and Neoclassical homes.
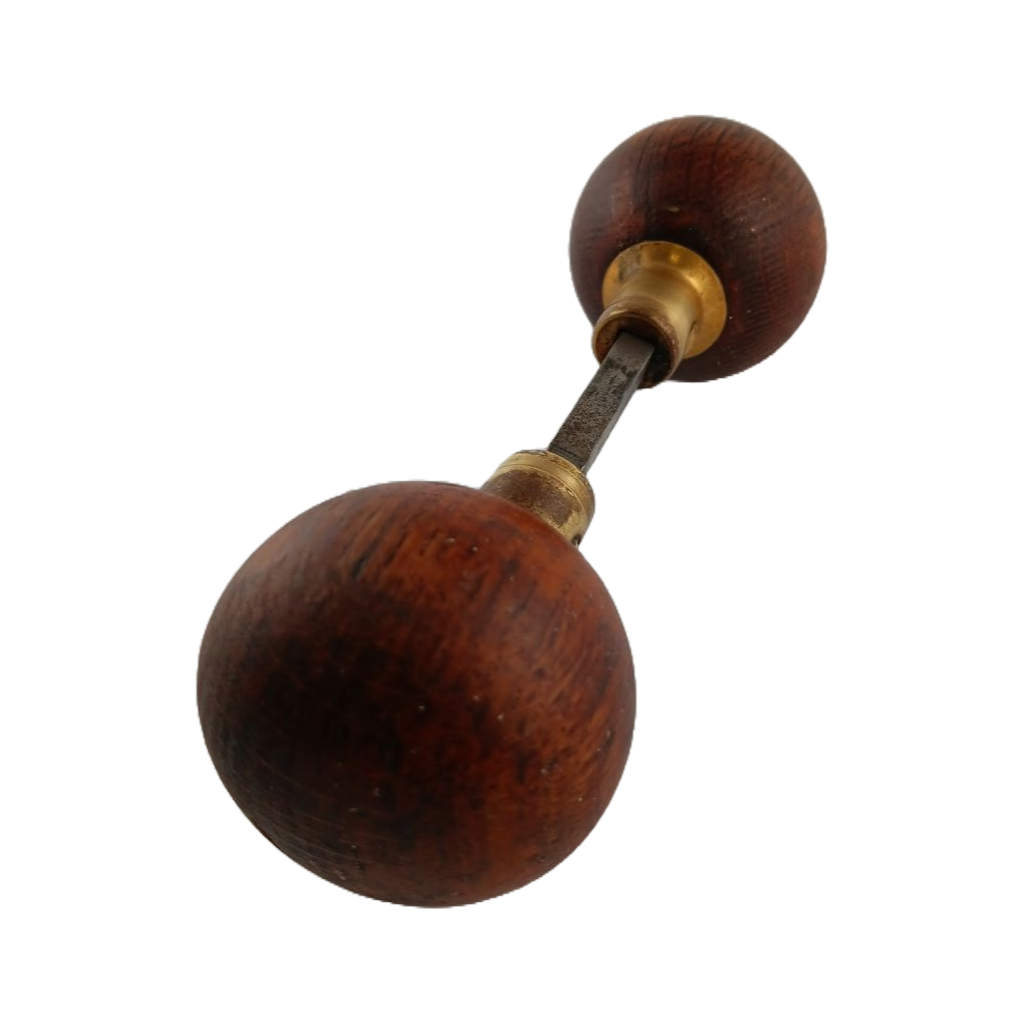
Wood Door Knobs
Overview: Wood knobs were a staple in early homes due to their availability and ease of production. They are often paired with rim locks or simple mortise locks and feature a natural, warm finish that complements rustic or period homes.
Styles:
Plain or Stained Wood: Often found in utilitarian homes or rural settings.
Ebonized Wood: Dark-stained knobs that mimic the look of more expensive materials like ebony.
Painted or Lacquered Finishes: Some wood knobs were painted or lacquered for decorative purposes.
Best For: Early 19th-century homes, cottages, or farmhouses.
Care: Wood knobs may require occasional cleaning and oiling to prevent drying or cracking, especially if they’re antique.
One of the most prominent manufacturers of architectural hardware in the late 19th century, Corbin produced intricate designs in brass and bronze. Their collections include ornate patterns inspired by the Victorian and Aesthetic movements.
Known for their high-quality castings and artistic detailing, Russell & Erwin specialized in intricate brass and bronze knobs. Their designs range from Gothic motifs to floral Art Nouveau patterns.
This company offered a wide variety of knobs, from functional pressed steel models to high-end decorative brass and bronze designs. They were a go-to manufacturer for many period homes.
Renowned for its elaborate designs, Reading Hardware focused on producing stunning patterns and complete locksets in brass and iron.
Tips for Choosing the Right Door Knob
Match the Style: Consider the period and architecture of your home when selecting a knob style. A glass knob may look out of place on a rustic door, while a cast iron knob complements it perfectly.
Check Compatibility: Verify that the spindle fits your lock type, and measure the spindle-to-keyhole distance carefully.
Pair with Backplates or Face Plates: If your door requires a full face plate, ensure the hardware matches the spindle and keyhole distance. Alternatively, keyhole covers and rosettes offer flexibility and elegance.
Don’t Forget Maintenance: Antique knobs may require cleaning or minor repairs to restore their original charm.
Final Thoughts
Choosing the right door knobs for old doors is about more than just aesthetics—it’s about honoring the craftsmanship and history of your home. Whether you’re drawn to ceramic Bennington knobs, timeless glass, or detailed brass designs, the right door knob will enhance your restoration project.
Explore our carefully curated collection of antique and vintage door knobs to find the perfect fit for your home. If you’re unsure what you need, contact us—we’d be happy to help you select the ideal hardware for your project.
Where to Buy Antique Door Knobs: Finding the Perfect Match for Your Antique Doors
If you’re restoring a historic home or simply love the charm of vintage details, finding the right door knobs for antique doors is an essential step. Authentic antique door hardware adds character and period accuracy, but sourcing high-quality pieces can be a challenge.
There are many places to look for antique door knobs, each with its pros and cons. In this guide, we’ll explore your best options and share tips on choosing the perfect pieces for your project.
Where to Buy Antique Door Knobs
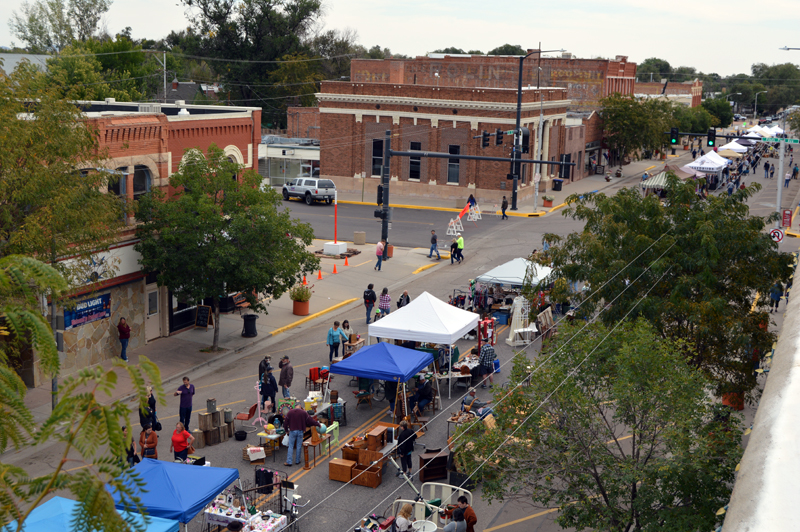
1. Flea Markets & Antique Shops
Flea markets and antique stores can be great places to stumble upon unique hardware. These locations often carry authentic, one-of-a-kind pieces, and the thrill of the hunt can be exciting.
🔹 Pros: You might find rare or unusual door knobs at great prices. 🔹 Cons: Selection is hit or miss—some days you’ll find a treasure, and other times, nothing at all. Antique stores often have just one or two pieces, making it hard to find matching sets.
2. Online Marketplaces (eBay, Etsy, Auctions)
Shopping online opens up a world of possibilities, offering access to a vast selection of antique door knobs from all over the country (or even the world). If you’re looking for something specific, marketplaces like eBay or Etsy may have exactly what you need.
🔹 Pros: Huge variety and easy browsing from home. 🔹 Cons: Hard to verify condition and authenticity without seeing items in person. Returns can be tricky, and some sellers may not disclose wear, missing parts, or size incompatibilities.
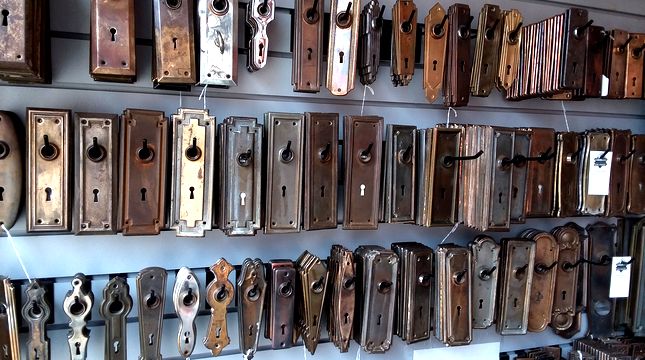
3. Architectural Salvage Shops
Architectural salvage shops specialize in reclaimed materials from historic buildings, making them a natural choice for finding antique door knobs. They often carry full sets with matching backplates, and you may even find entire vintage locksets.
🔹 Pros: Authentic, salvaged hardware that fits period homes. 🔹 Cons: Inventory isn’t always cleaned, organized, or restored. Some pieces may need extra work to make them functional again.
4. Dedicated Antique Hardware Specialists
For a curated selection of authentic, high-quality antique door knobs, shopping with a specialized antique hardware dealer (like us!) can be the best option. These shops focus on antique and vintage hardware, ensuring that items are carefully restored, cleaned, and ready to install.
🔹 Pros: Guaranteed authenticity, period-correct hardware, and expert guidance to help you choose the right fit. 🔹 Cons: Prices may be higher than flea market finds, but you’re paying for quality and convenience.
Final Thoughts
Now that you know where to find antique door knobs you know it can take time, but the results are well worth the effort. Whether you enjoy the hunt at flea markets or prefer the ease of shopping from a trusted antique hardware specialist, there are plenty of ways to bring history back to life in your home.
If you’re looking for a carefully selected collection of authentic antique door hardware, browse our inventory—we’re always adding unique, period-appropriate pieces to help complete your restoration project. If you can’t find exactly what you’re looking for, reach out to us—we have an extensive inventory that hasn’t made it to our website yet!
Have a question about antique door knobs? Let us know —we’re happy to help!
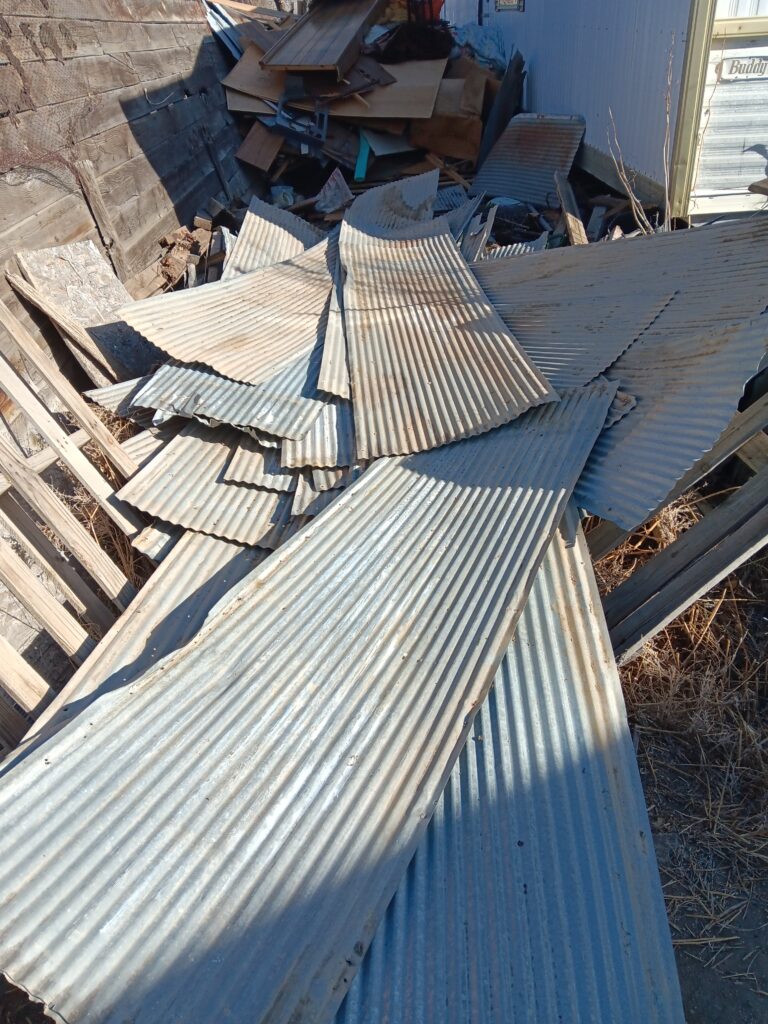
Salvage Job: Corrugated Metal Rescue from a Historic Barn
At Salvage Antiques Vintage Etc., every salvage job tells a story—one of history, sustainability, and giving old materials a new life. Recently, we had the exciting opportunity to work on a property cleanup where the barn was slated for demolition in Florence, Colorado. Thanks to the foresight of the new property owner, we were able to salvage a treasure trove of corrugated metal before it was lost forever.
A Treasure Trove of Corrugated Metal
The barn, which had stood for decades, featured over 100 sheets of 1-inch corrugated metal. These sheets, ranging from 6 to 10 feet in length, had weathered beautifully over time, developing a rich patina that only age can provide. Each sheet tells its own story—of storms weathered, work completed, and the enduring strength of quality materials.
Salvaging the metal wasn’t just about rescuing materials; it was about preserving a piece of the property’s history. Corrugated metal like this is perfect for a variety of projects, from restoration work on other historic structures to creating stunning feature walls, furniture, and even custom décor.
Why Salvaging Corrugated Metal Matters
By salvaging these materials, we’re contributing to a more sustainable future. Corrugated steel has a long lifespan, and reusing it eliminates the need for energy-intensive production of new materials. Instead of sending it to a landfill, this metal is now ready to be repurposed and enjoyed by those who appreciate its rustic charm and practicality.
Here’s why salvaging corrugated metal is a win for everyone:
Environmental Benefits: Reduces landfill waste and conserves resources by reusing existing materials.
Cost-Effective: Salvaged metal is often more affordable than new materials, making it a smart choice for budget-conscious builders and designers.
Aesthetic Appeal: The weathered look of vintage corrugated metal adds character and authenticity to any project.
Historic Preservation: Rescuing materials from old barns and structures keeps a piece of history alive.
Available Now: Corrugated Metal Sheets
We’re thrilled to offer these salvaged sheets of 1-inch corrugated metal to our customers. With over 100 pieces in stock, ranging from 6 to 10 feet, they’re ideal for restoration projects, DIY creations, and unique architectural designs. Whether you’re a contractor, designer, or homeowner, this metal can add a touch of rustic elegance to your next project.
Get in Touch
If you’re interested in purchasing some of this salvaged material and more, contact us or visit our store. Each piece is unique and full of character, ready to bring history into your project.
Salvaging this barn’s materials was a rewarding experience, and we’re excited to see how these sheets will be transformed and reused. Stay tuned for more stories from the salvage road, and remember—every piece has a history worth preserving!
Why Legislation is Needed to Support Salvage Businesses, Property Owners, and the Environment
Every year, millions of tons of building materials are discarded in landfills as properties are demolished, contributing significantly to environmental degradation. Architectural salvage businesses play a critical role in saving valuable materials, preserving history, and reducing landfill waste. However, without proper legislative support, countless architecturally significant materials are lost forever during demolition.
Legislation that requires demolition companies to prioritize salvage operations could revolutionize the industry, benefiting property owners, salvage businesses, and the environment alike. Let’s explore the need for such laws and how they could work.
The Problem: Waste from Demolition
Demolition projects generate enormous amounts of waste. According to studies, construction and demolition (C&D) waste accounts for approximately 40% of total landfill content in many cities. This waste includes valuable architectural materials such as:
Vintage doors, windows, and trim.
Rare hardwood flooring.
Decorative hardware, lighting fixtures, and more.
Most of these materials are perfectly reusable and highly sought after by architectural salvage businesses and restoration enthusiasts. Unfortunately, demolition schedules often prioritize speed over sustainability, leaving no time for salvage operations.
The Solution: Salvage-First Legislation
A potential legislative solution would require demolition companies to allocate 1–2 days before demolition for local salvage businesses to remove reusable materials. Alternatively, demolition companies could be mandated to salvage as much as possible themselves, ensuring that valuable materials are diverted from landfills.
Key benefits of such legislation include:
Environmental Impact: Salvaging materials reduces landfill waste and the demand for new materials, lowering greenhouse gas emissions from manufacturing and transportation.
Economic Opportunity: Salvage businesses create jobs, support local economies, and provide affordable materials for restoration and remodeling projects.
Historic Preservation: Salvage operations save architecturally significant items, preserving cultural heritage for future generations.
Support for Property Owners: Property owners could earn additional income by selling salvaged materials or benefit from tax deductions for donating them.
Learning from Existing Models
Cities like Portland, Oregon, and Austin, Texas, already have ordinances requiring deconstruction instead of demolition for certain types of buildings. These ordinances prioritize the reuse of materials and encourage salvage efforts, setting an example for other regions to follow.
According to the Sustainable City Code, such policies reduce waste while creating economic opportunities in the reuse market. Additionally, the C40 Cities Knowledge Hub highlights that deconstruction can recover up to 90% of a building’s materials for reuse, compared to just 50% through traditional demolition.
How It Could Work
A legislative framework to support salvage operations could include:
Mandatory Salvage Period: Require a 1–2 day period before demolition begins for salvage companies to access the site.
Deconstruction Requirements: Mandate deconstruction instead of demolition for buildings with historical or architectural significance.
Incentives for Compliance: Offer tax credits or reduced landfill fees to demolition companies that meet salvage or deconstruction targets.
Fines for Non-Compliance: Penalize companies that fail to provide access or prioritize salvageable materials.
Support for Salvage Businesses: Create grants or funding opportunities to help local salvage businesses expand their operations.
Why Now?
With the growing demand for sustainable practices and the increasing awareness of environmental issues, the time is ripe for legislative action. Consumers are embracing reused materials for their charm, affordability, and eco-friendliness. Implementing salvage-first laws aligns with these trends and helps cities achieve waste reduction and sustainability goals.
How You Can Help
Advocating for this type of legislation starts with spreading awareness. Reach out to your local representatives and city planners to share the benefits of salvage-first laws. Encourage them to study successful models like those in Portland and San Antonio. Together, we can save valuable materials, support small businesses, and protect the environment for future generations.
By making salvage operations a standard part of demolition practices, we take a significant step toward a more sustainable, resource-conscious future.
The Interwoven History of America’s Top Hardware Companies and Their Path to ASSA ABLOY
The story of the American hardware industry is not just about innovation and craftsmanship but also about deep personal relationships and strategic mergers that ultimately shaped the modern hardware market. Many of the top companies in the hardware industry had founders who were connected through partnerships, family ties, or shared business ventures. These relationships created a network of companies that merged over time, culminating in the global dominance of ASSA ABLOY. Let’s explore this fascinating history and how these companies came together.
The Founding Fathers of Hardware
The hardware industry in the 19th and early 20th centuries was dominated by a handful of companies founded by visionary leaders:
Russell & Erwin Manufacturing Company (1839): Established by Henry E. Russell, Cornelius B. Erwin, and Frederick T. Stanley in New Britain, Connecticut. They produced high-quality locks and builder’s hardware, becoming one of the largest hardware manufacturers in the U.S.
P. & F. Corbin (1849): Philip and Frank Corbin also founded their company in New Britain, focusing on locks and architectural hardware. Their proximity to Russell & Erwin fostered collaboration and competition.
Yale & Towne Manufacturing Co.(1868): Founded by Linus Yale Jr. and Henry Towne, this company revolutionized the lock industry with the invention of the modern pin tumbler lock.
Sargent & Co. (1810): Based in New Haven, Connecticut, Sargent was known for its diverse range of hardware products, including door locks and hinges.
Lockwood Hardware Manufacturing Co. (1888): Established in South Norwalk, Connecticut, Lockwood specialized in high-quality locks and builder’s hardware.
Belleville Hardware and Lock Manufacturing Company (1885): Founded by William C. Springer in Peterborough, Ontario, this company established Springer as a pioneer in the hardware industry. In 1910, Springer left Belleville to create theSpringer Lock Company, further cementing his influence in the industry.
A Network of Relationships
The founders of these companies often had overlapping business and personal connections. For instance:
Henry E. Russell and Philip Corbin were both part of the burgeoning hardware industry in New Britain, sharing suppliers and trade networks.
Frederick T. Stanley, after leaving Russell & Erwin, founded his own hardware company, which later merged with others.
Linus Yale Jr.’s partnership with Henry Towne led to the widespread adoption of the pin tumbler lock, inspiring competitors like Russell & Erwin and Corbin to innovate their own designs.
William C. Springer’s ventures, including both the Belleville Hardware and Lock Manufacturing Company and the Springer Lock Company, highlight how one individual’s vision could shape multiple influential businesses.
The Era of Consolidation
By the early 20th century, these companies began to merge to strengthen their market positions:
Russell & Erwin + P. & F. Corbin = American Hardware Corporation (1902): This merger created a hardware powerhouse that combined their expertise in locks and architectural hardware.
Lockwood + Yale & Towne: Lockwood was eventually absorbed into Yale & Towne, which was expanding its product line and global reach.
American Hardware Corporation + Yale & Towne: Over time, these giants collaborated and shared market space, setting the stage for further consolidation.
Sargent & Co. Joins Forces: Sargent became a key player in the mergers, bringing its diverse product line into the fold.
The Formation of ASSA ABLOY
In the late 20th century, the global demand for security solutions led to the formation of ASSA ABLOY in 1994 through the merger of ASSA (Sweden) and Abloy (Finland). ASSA ABLOY began acquiring leading hardware companies around the world, including many of the historic American brands:
1996: ASSA ABLOY acquired Yale & Towne.
2000: Corbin Russwin (formerly American Hardware Corporation) became part of the ASSA ABLOY group.
Sargent & Co., along with other prominent brands, also joined the ASSA ABLOY family, solidifying its position as a global leader in door hardware and security solutions.
Discover the Legacy
The history of American hardware companies is a testament to innovation, collaboration, and the enduring impact of thoughtful design. From the pioneering efforts of Russell & Erwin and P. & F. Corbin to the strategic vision of William C. Springer, these companies laid the foundation for modern hardware solutions. Today, as part of ASSA ABLOY, their legacy lives on, providing quality and security to homes and businesses around the world.
The Environmental Benefits of Using Salvaged Hardware
In today’s world, where sustainability and environmental consciousness are increasingly important, making eco-friendly choices for your restoration or remodeling projects can have a significant impact. One of the simplest yet most effective ways to embrace sustainability is by incorporating salvaged hardware into your designs. By choosing hardware that was crafted decades—or even a century—ago, you’re not only adding a touch of history to your space but also making a meaningful contribution to the planet.
Why Salvaged Hardware is the Ultimate Sustainable Choice
Every piece of salvaged hardware represents a product that doesn’t need to be mined, manufactured, or packaged again. Unlike modern reproductions, which require raw materials to be extracted and processed, salvaged hardware has already been made. By reusing these pieces, you eliminate the environmental costs associated with:
Mining: Modern hardware often requires new metal, which involves invasive mining practices that harm ecosystems, displace wildlife, and contribute to soil and water pollution.
Manufacturing: The process of refining raw materials into finished products consumes vast amounts of energy and releases significant carbon emissions.
Packaging and Shipping: Reproductions are often packaged in plastic and shipped across long distances, adding to waste and carbon footprints.
Storage and Retail: New hardware spends time in warehouses and stores before it even reaches your project, adding to the environmental toll.
When you choose salvaged hardware, you’re effectively removing all these steps. You’re purchasing something that already exists and has stood the test of time, making it infinitely more sustainable than newly manufactured reproductions.
Preserving Resources and Reducing Waste
Salvaged hardware is a prime example of the reduce, reuse, recycle philosophy. By opting for antique or vintage pieces, you:
Reduce Waste: Each salvaged item you use is one less piece sent to a landfill. Hardware from demolished buildings or renovations often ends up as waste, but by salvaging it, you’re giving it a new life.
Conserve Natural Resources: Reusing existing hardware means fewer raw materials need to be extracted from the Earth.
Minimize Energy Use: The energy required to restore or clean salvaged hardware is minimal compared to the energy needed to produce new items.
The Quality of Salvaged Hardware
One of the biggest advantages of salvaged hardware is its superior craftsmanship. Much of the antique hardware available today was made in an era when quality and durability were paramount. These pieces were designed to last for generations and often feature intricate designs and high-quality materials that are difficult to find in modern reproductions.
By incorporating salvaged hardware into your project, you’re not just choosing sustainability; you’re also choosing better quality. Authentic antique pieces are a testament to enduring craftsmanship, ensuring that your hardware will continue to function beautifully for years to come.
Adding Character and History to Your Space
Beyond the environmental benefits, salvaged hardware brings character and authenticity to any project. Each piece tells a story, adding depth and uniqueness that can’t be replicated by mass-produced items. Whether it’s a Victorian-era door knob, a hand-forged hinge, or a set of ornate drawer pulls, salvaged hardware serves as a conversation starter and a connection to the past.
Making the Switch to Salvaged Hardware
Incorporating salvaged hardware into your projects is easier than you might think. Reputable retailers offer a wide selection of carefully curated antique hardware. These items are cleaned and ready for use, making them a convenient and sustainable choice.
If you’re looking to reduce your carbon footprint, enhance your designs, and preserve a piece of history, salvaged hardware is the way to go. Skip the mining, manufacturing, and unnecessary waste. Instead, invest in authentic antique hardware that’s better for the environment, better for your project, and better for future generations. Shop our antique hardware for your project.
Explore American Antique Hardware Manufacturer Logos
Our collection of builders’ hardware manufacturer logos is growing, featuring dozens of iconic American brands that helped shape the industry. From intricate designs to timeless emblems, these logos represent the craftsmanship and innovation of historic hardware makers.
We’re continually adding more logos to our collection, ensuring they’re cleaned up and presented in high-quality black and transparent background PNG formats for your use.
If you notice a manufacturer logo we’ve missed, let us know! We’re happy to expand the collection and preserve the legacy of these remarkable companies. Check back often to see what’s new in our collection.
It’s incredible to consider the vast array of finishes that were once available for antique hardware, reflecting the high level of craftsmanship and customization offered by manufacturers of the time. This sample list, derived from the catalog of Earle Hardware Manufacturing Co., showcases the variety and detail that even smaller manufacturers provided to their customers.
Earle Hardware Manufacturing Co. was one of many companies that transformed the hardware industry by offering an extensive selection of finishes and materials. These options not only served practical purposes but also added a layer of aesthetic appeal to architectural and decorative hardware. Below is an example of the range of finishes and materials available, highlighting the attention to detail and commitment to quality that defined antique hardware production.
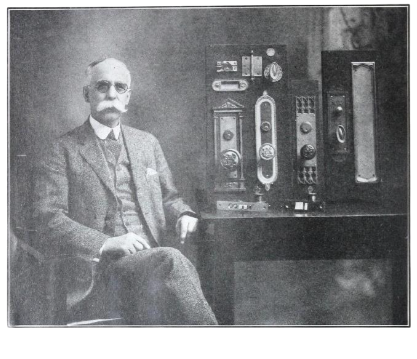
The Legacy of Wm. C. Springer: Canada’s Pioneer Lock Manufacturer
When discussing the history of lock and hardware manufacturing in Canada, one name stands out—Mr. Wm. C. Springer. With nearly fifty years of expertise in the industry, Springer was a trailblazer who played a key role in shaping Canada’s builders’ hardware market. From his early beginnings in Cleveland, Ohio, to establishing one of Canada’s leading hardware companies, Springer’s legacy is one of innovation, quality, and service.
A Career Rooted in Innovation
Born in Cleveland, Ohio, Mr. Wm. C. Springer began his career in woodworking establishments and later expanded into the manufacturing of plumbing supplies, globe valves, and steam cocks. His early experiences laid the groundwork for his future ventures in the hardware industry.
In 1885, Springer made a pivotal move to Canada, joining a group of five men to establish a general line of builders’ hardware. As the first to begin work in the factory, he played a hands-on role in shaping the company’s operations. After a nine-year tenure, Springer returned to Cleveland in 1894, only to return to Canada in 1898 to resume his passion for hardware manufacturing.
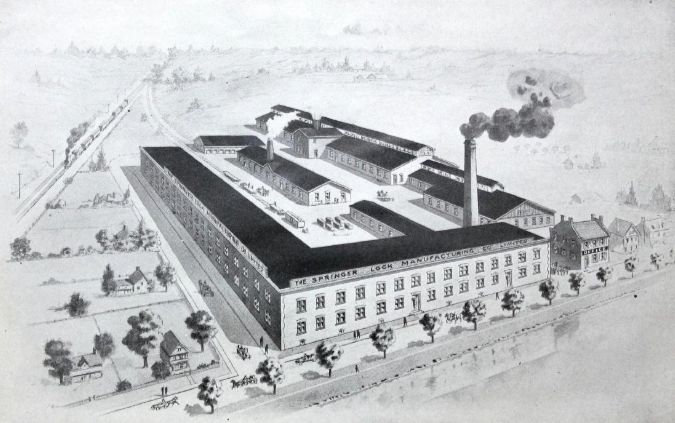
Establishing the Belleville Hardware Legacy
In 1901, Springer relocated from Toronto to Belleville, Ontario, where he organized the Belleville Hardware Company. Under his leadership, the company thrived for nine years, building a reputation for exceptional quality and service. In 1910, Springer resigned from the Belleville Hardware Company to establish a new company under his own name, The Springer Lock Manufacturing Company, continuing to focus on high-quality hardware production.
A Commitment to Excellence
Springer’s unwavering commitment to quality and service quickly earned his company a strong reputation. Demand for Springer’s hardware grew so significantly that the business expanded its facilities to 42,000 square feet, with further expansions planned to meet increasing demand. Springer hardware wasn’t just limited to Canada—it was shipped to England, Australia, New Zealand, Mexico, China, and other major markets worldwide.
Craftsmanship in Iconic Buildings
Springer’s hardware was featured in some of the most prestigious buildings of the era. From schools and churches to banks and courthouses, Springer hardware became synonymous with quality. Exclusive period-specific designs were chosen for prominent projects, including the Lieutenant Governor’s residence in Quebec and the Sun Life Head Office Building in Montreal—then the largest and finest finished office building in the British Empire. These projects demanded only the highest grade of solid bronze hardware, a standard Springer consistently met.
Explore Springer Hardware Today
Springer’s legacy continues to resonate with collectors, restoration professionals, and those passionate about preserving historic craftsmanship. If you’re looking for authentic Springer hardware or period-specific designs for your restoration or collection needs, explore our curated selection on our website. Bring a piece of history into your project with the exceptional craftsmanship that defined Wm. C. Springer’s pioneering company.